Needlepoint guide
How to finish a needlepoint ornament
A flat ornament is a good first piece to finish at home. This method wraps the needlepoint and a fabric back over two pieces of board, joins them, and runs a cord around the edge.
Before you finish stitching
Stitch two or three extra rows of tent stitch around the design in the background color. A little stitching is lost over the edge of the board, and the extra rows keep bare canvas from showing.
What you need
- The stitched ornament, blocked and dry
- Acid-free 4-ply mat board, or acid-free foam board an eighth of an inch (3 mm) thick
- Thin batting, about an eighth of an inch (3 mm) thick
- Backing fabric
- Scissors, a craft knife, a pencil and, for a round, a compass or a glass to draw around
- Tacky glue or fabric glue
- Pins, and clips as well if you use mat board, finish a square or rectangle, or lace the canvas
- Heavy-duty sewing thread to match the backing or the cord, and a needle. A curved needle helps at the edge.
- Twisted cord, bought or made from a skein of floss. Measure round the edge of the stitching and add about 8 inches (20 cm): about 6 inches (15 cm) for the loop of step 8, which goes three inches up and three back down, and about an inch (2.5 cm) for each of the two ends. A 4 inch (10 cm) round takes about 21 inches (53 cm).
- A few books, to weight the ornament while the glue dries
Steps
Treat the glue as permanent. Once it has dried, the canvas is hard to adjust and hard to make into anything else later. In step 3 the canvas can be laced over the board with a needle and thread instead, and lacing can be cut out and done again until the halves are glued together in step 5. To lace, wrap the front as in step 3 but hold the tabs, which are cut in step 2, with clips, and use no glue. Knot a doubled thread and take it through the tab at the top, across the back of the board and through the tab at the bottom. Cross the back again to the tab next to the top one, going clockwise, and from that tab to the one opposite it, and go on round in the same way, so that the thread crosses the back of the board each time. Pull the canvas taut but not so tight that the board bends or a tab tears, and knot the thread when every tab is held.
These steps are for a round, and an oval goes the same way. A square or rectangle differs in two things: its straight sides are not snipped into tabs, and its corners are mitered. When the glue goes on in step 3, fold in and glue each corner first, then the sides, and hold them with clips until the glue sets.
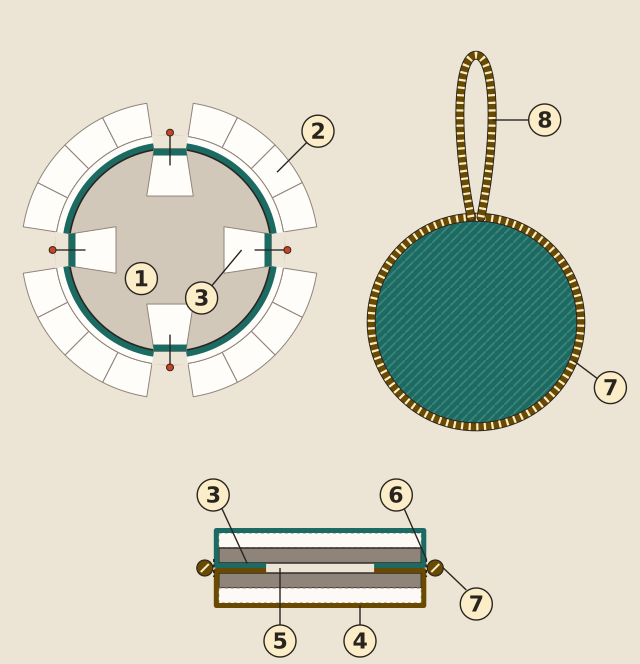
- Cut the boards. Cut two pieces of board to the shape of the stitched area, extra rows included, and a quarter inch (6 mm) smaller across, so a round stitched 4 inches (10 cm) across takes boards 3 3/4 inches (9.5 cm) across. Draw the shape on the board in pencil first and cut along the line: for a round, draw the circle with a compass, or around a glass or other round thing of the right size. Cut two pieces of batting the same size as the boards.
- Trim the canvas to a margin of three quarters of an inch (2 cm) all round. Snip into the margin about every three quarters of an inch (2 cm) to make tabs, stopping an eighth of an inch (3 mm) short of the stitching.
- Wrap the front. Lay the needlepoint face down. Put a piece of batting on it, then a board. Pull one tab up over the edge of the board and hold it there, with a pin pushed through the tab into the edge of foam board or with a clip on mat board. Do the same on the opposite side, then at the quarters, then fill in between, pulling firmly so the stitching wraps round the edge of the board. Look at the front before any glue goes on: no bare canvas should show. Then glue each tab to the back of the board, taking off one clip at a time and putting it back once its tab is glued, and leave the pins or clips on until the glue is dry.
- Wrap the back. Lay the backing fabric face down and put the second piece of batting on it, then the second board. Cut the fabric three quarters of an inch (2 cm) bigger than the board all round and snip tabs every three quarters of an inch (2 cm), stopping a quarter inch (6 mm) short of the board. Then glue the tabs down. Fabric needs only smoothing, not pulling.
- Join front to back. When both are dry, run a line of glue round the back of one half, a quarter to half an inch (6 mm to 1.3 cm) in from the edge so that none is pressed out there, and put a dab in the middle. Leave a gap of about an inch and a half (4 cm) in the line at the top of the design, where the hanging loop will go. Press the two halves together back to back, and rest a few books on top while the glue dries.
- Stitch the edge. With the heavy thread, work a ladder stitch around the edge from one side of the gap at the top to the other: pick up three or four canvas threads at the edge of the needlepoint, then about a quarter inch (6 mm) of the backing fabric where it folds over the edge of its board, and pull the thread snug to draw front and back together. Leave the gap open. The cord will cover these stitches.
- Add the cord. Push one end of the cord into the gap at the top: on cord you made, the folded end and not the knotted one. On bought cord, work a little glue into the end first and let it dry, which stiffens the tip and makes it easier to push in. Run a thin line of glue along the edge about three inches (8 cm) at a time, keeping it off the stitching and the backing, since too much squeezes out from under the cord. Lay the cord on the glue, pinning it as you go with pins pushed down through the cord and into the edge of the ornament where the two halves meet, until you are back at the top. The pins stay in until the glue is dry.
- Make the hanger. At the top, take the cord up and back down in a loop about three inches (8 cm) long from the edge of the ornament to its tip, which uses about 6 inches (15 cm) of cord. Put glue on the cord half an inch to an inch (1.3 to 2.5 cm) past the base of the loop, let it dry, cut it there and push the end into the gap. Stitch the gap closed, taking a few extra stitches through the base of the loop.
Tips
- To make cord, tie one end of a bundle of long threads to something fixed and twist the other end until the bundle wants to spring back on itself. Hold the middle, bring the two ends together and let it twist into a cord. Then knot the two loose ends together. Start with thread at least three times as long as the cord you need.
- Start with a round or a rectangle. Even professional finishers often charge more for irregular outlines. For sending a piece to a finisher, see needlepoint finishing.
- For a design to finish this way, see the ornament patterns and the Christmas ornament patterns. The canvas size calculator answers how big a chart will be on your mesh and how much canvas to cut.
- The insert for an acrylic tray is made in much the same way. The two main differences are that it has no loop to hide the ends of the cord and that it has to be measured to fit: see self-finishing needlepoint.