Cross stitch guide
How to make your own stamped cross stitch
Plain cloth has no squares to count, so give it some. Put a grid of dots on the cloth, mark an X in a wash-out pen wherever the chart has a stitch, then stitch over the marks and wash them away. Waste canvas is the other way, with nothing to draw.
On this page 8 parts
Why a chart cannot simply be traced
A cross stitch chart is a grid, and on Aida the cloth is the grid too: you count squares and the holes keep every X the same size. A pillowcase, a towel or a piece of plain cotton has no squares. To cross stitch on it neatly you have to supply the grid yourself. There are three ways:
- Mark it on the cloth with a pen that washes out. This page shows how.
- Stick on a wash-away sheet that carries the grid.
- Lay waste canvas on top, stitch through it, and pull it out afterwards.
Choose a small design in few colors for a first try. The Easy patterns here are four colors or fewer.
What you need
- A chart
- Plain cloth in a light color, which can be washed
- A wash-out fabric pen. Test it on a scrap of the same cloth first: mark, let it dry, and wash it out
- A sheet of graph paper at the size of stitch you want. The graph paper tool prints one at 14 squares to the inch, and at other sizes
- Tape, and a window or a light box
- An embroidery needle. It has a sharp point, which plain cloth needs, where Aida takes a blunt one
Mark the cloth in two steps
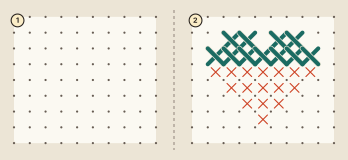
- Tape the graph paper to the window or light box, and tape the cloth over it, with its weave running straight along the lines of the grid.
- Dot the grid (1). With the wash-out pen, put a dot on the cloth at every corner of the grid, across the area the design will cover. Each dot is where the needle will go.
- Mark the design (2). Take the cloth down. Find the middle of the dotted area and the middle of the chart. Square by square, mark a small X between four dots wherever the chart has a stitch.
- Show the colors. For more than one color, mark each color's squares differently: an X for one, a circle for another.
- Stitch over the marks, from dot to dot. A hoop keeps plain cloth taut. Work each cross as usual, with every top leg leaning the same way.
- Wash the marks out when the stitching is finished, the way the pen's instructions say. Do not wash the cloth before then: the marks are the pattern.
After step 3 you do not need the chart for placing stitches, only for the colors. That is what makes a marked piece easy to carry about.
Use a stick-on, wash-away sheet instead
Wash-away stabilizer is sold in sheets that go through a home printer and have a sticky back. Print the dotted grid onto a sheet, mark the design on it with the pen, cut it out, peel off the backing and stick it where the design should go. Stitch through the sheet and the cloth together, then rinse the piece in warm water until the sheet has gone.
Nothing is drawn on the cloth itself. It is only for things that can be washed.
The other way: waste canvas
Waste canvas is a loose, stiff canvas with a clear grid. You baste a piece onto the cloth, count and stitch through both layers as if the canvas were Aida, then dampen it and pull its threads out one by one from under the stitches. Soluble canvas does the same job and dissolves in water.
With these you still count from the chart, and nothing has to be marked. How to cross stitch on clothes with waste canvas goes through it step by step.
Stamped quilt blocks
Stamped quilt blocks are squares of plain cloth, each printed with a design in Xs and lines. You stitch over the print on each block, usually in a hoop. Then the blocks are sewn together and finished as a quilt with batting and a backing. Water takes the print out, so keep the blocks dry until the work is done and wash them when the maker's instructions say.
You can make blocks of your own with the marking method above: cut the squares, mark the same grid on each, and stitch. Cross stitch quilts covers how they are joined and finished.
Common mistakes
- Not testing the pen. Pens differ, and so does cloth. Mark a scrap of the same cloth, let it dry and wash it, to see that the marks show and that they come out.
- Marking where you will not stitch. Mark only the squares that hold stitches, and keep the marks small.
- Washing too soon. Water takes the marks away. Keep the piece dry until the last stitch is in.
- Letting the cloth shift on the grid. Tape it down on all four sides before you dot.
Where to go next
No chart yet? Draw one in the pattern maker, or pick one of the patterns here. For how bought stamped pieces compare with counted charts, see Stamped vs counted cross stitch.