Sitting cat crochet pattern
Intermediate · 3 colors
PDF · US Letter · 8 pages · Change paper
- Size
- About 5¼ in (13.5 cm) tall to the tips of its ears, and about 6 in (15.5 cm) from front to back
- Skill
- IntermediateSingle crochet in a spiral with increases and decreases, 9 pieces to stuff and sew together, and a face or details to embroider
Paper for the PDF
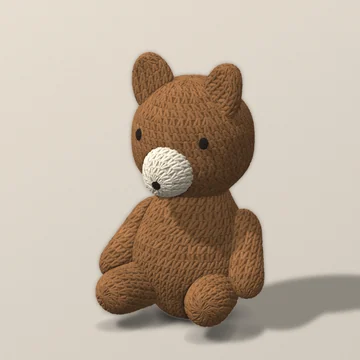
A cat sitting upright: a round head, an egg-shaped body with a flat base, two pointed ears, two front legs, two hind feet and a tail that lies on the table behind. About 5¼ in (13.5 cm) tall to the tips of its ears, and about 6 in (15.5 cm) from front to back.
Gauge
20 stitches and 22 rounds to 4 in (10 cm) in single crochet worked in a spiral, the piece stuffed.
Work tightly enough that the stuffing does not show. Every size given is about, and moves with your gauge.
How to measure it
Work a gauge piece first (20 rounds)
A test piece to measure and pull out. It is not the start of the pattern.
A toy's gauge is measured on a small piece worked in the round, not on a flat swatch. Work the gauge piece (20 rounds), stuff it lightly, press its open edge flat and measure: about 3 in (7.5 cm) from fold to fold, which is half of its 30 stitches, and about 1¾ in (4.5 cm) over ten of its even rounds. If it is wider, use a smaller hook; if it is narrower, a larger one.
20 rounds. Stuff it lightly before you measure. It is not part of the toy, and its yarn is not in the amounts.
- Gauge piece foundationMake a magic ring.
- Gauge piece rnd 1 (RS)6 sc in MR(6 sc)
- Gauge piece rnd 22 sc in each st around(12 sc)
- Gauge piece rnd 3repeat: 2 sc in next st, sc in next st 6 times(18 sc)
- Gauge piece rnd 4repeat: Sc in next 2 sts, 2 sc in next st 6 times(24 sc)
- Gauge piece rnd 5Sc in each st around(24 sc)
- Gauge piece rnd 6repeat: 2 sc in next st, sc in next 3 sts 6 times(30 sc)
- Gauge piece rnds 7 to 20Sc in each st around(30 sc)
- EndWhen it is measured, fasten off, leaving a 6 in (15 cm) tail, or pull the piece out and use the yarn.
Before you start
- Worked in a spiral with the right side facing: do not join the rounds and do not turn. Put the stitch marker in the first stitch of every round, move it up as you go, and count the stitches against the number at the end of the line.
- Right side out: the side facing you as you work is the outside of the piece. A small piece often curls so that the wrong side faces out; push it through to the right side after a few rounds.
- Magic ring: wrap the yarn round two fingers, work round 1 into the loop, then pull the tail until the ring is closed. If you prefer, begin with 2 chains and work round 1 into the first of them.
- Sc2tog on a stuffed piece: put the hook under the front loop only of each of the next two stitches, then finish the stitch as one. It closes more neatly than working under both loops.
- BLO is back loop only: put the hook under the back loop of the stitch, the one farther from you, and not under both. The front loops left over make a ridge on the outside, and the piece turns a corner there: that ridge is the edge of a flat base.
- Square brackets hold a repeat: work what is inside as many times as it says. The number in parentheses at the end of a line is the stitches that round leaves.
- Written for right-handed work. Left-handed makers work round the other way, which mirrors the lean of the stitches; every place in this pattern is given for right-handed work.
- Front and back. Each piece that other pieces or details are placed on has a front, fixed once on one round: on the head, stitch 22 of round 10 (which has 42 stitches); on the body, stitch 19 of round 8 (which has 36 stitches). Count along that round with the marked first stitch as stitch 1, and mark the stitch named with a scrap of yarn as you work the round. When the piece is finished, run a marking thread straight up and down the piece through that stitch, by eye, not by following a column of stitches (stitches lean in a spiral, so a column drifts). The side opposite the thread is the back. Every place in this pattern is given from that thread, the front line, and from parts already on. Trust the thread and your eye over the stitch numbers.
- Rounds are counted from the start of each piece: round 1 is worked into the ring.
- Sewing on. Every seam is sewn with a yarn tail and the yarn needle in whip stitch: take the needle through a stitch of the edge and through the stitch or the fabric it lies against, pull the yarn through, and move on one stitch, always in the same direction. An open edge takes one sewing stitch for each of its stitches, under both loops of the stitch unless its step says otherwise; a flattened edge is sewn through both of its layers.
- Read the whole pattern before sewing anything on: each detail is given at the point where it is simplest to do.
- Details are worked after the toy is stuffed and sewn, each place pinned or marked first and judged from the front.
- Every size here is about, and grows and shrinks with your gauge. For a larger toy use a thicker yarn and a larger hook, keeping the fabric tight enough that the stuffing does not show.
- It rests on the flat base of the body, with the two hind feet in front and the tail behind touching the table.
Instructions
- “[ ]” is a repeat.
- The count at the end is what the row leaves.
- Tick a round when it is done. Your place is kept in this browser.
How to read these rows
Square brackets “[ ]” hold a repeat: work what is inside as many times as it says. In UK terms sc is double crochet and sc2tog is double crochet 2 stitches together.
Head
Yarn A, gray.
- Size at 20 stitches and 22 rounds to 4 in (10 cm): about 2¾ in (6.7 cm) across and 2¼ in (5.9 cm) tall. 21 rounds, 570 stitches.
- Round 1 is the top of the head; the last round is underneath, where the body is sewn on.
- Before round 20: Stuff firmly now, and top up just before the last round.
- FoundationMake a magic ring.
- Rnd 1RS6 sc in MRleaves (6 sc)
- Rnd 22 sc in each st aroundleaves (12 sc)
- Rnd 3repeat: 2 sc in next st, sc in next st 6 timesleaves (18 sc)
- Rnd 4repeat: Sc in next 2 sts, 2 sc in next st 6 timesleaves (24 sc)
- Rnd 5Sc in each st aroundleaves (24 sc)
- Rnd 6repeat: 2 sc in next st, sc in next 3 sts 6 timesleaves (30 sc)
- Rnd 7repeat: Sc in next 4 sts, 2 sc in next st 6 timesleaves (36 sc)
- Rnds 8 to 9Sc in each st aroundleaves (36 sc)Next: round 8 of 9
- Rnd 10repeat: 2 sc in next st, sc in next 5 sts 6 timesleaves (42 sc)
- Rnds 11 to 12Sc in each st aroundleaves (42 sc)Next: round 11 of 12
- Rnd 13repeat: Sc in next 5 sts, sc2tog 6 timesleaves (36 sc)
- Rnds 14 to 15Sc in each st aroundleaves (36 sc)Next: round 14 of 15
- Rnd 16repeat: Sc2tog, sc in next 4 sts 6 timesleaves (30 sc)
- Rnd 17repeat: Sc in next 3 sts, sc2tog 6 timesleaves (24 sc)
- Rnd 18Sc in each st aroundleaves (24 sc)
- Rnd 19repeat: Sc2tog, sc in next 2 sts 6 timesleaves (18 sc)
- Rnd 20repeat: Sc in next st, sc2tog 6 timesleaves (12 sc)
- Rnd 21repeat: Sc2tog 6 timesleaves (6 sc)
- EndFasten off, leaving a 6 in (15 cm) tail. Thread the tail through the front loop of each of the last 6 stitches, pull it tight to close the hole, and bury the end inside.
Body
Yarn A, gray.
- Size at 20 stitches and 22 rounds to 4 in (10 cm): about 2¼ in (5.7 cm) across and 2¼ in (5.9 cm) tall, on a flat base about 1½ in (3.8 cm) across. 18 rounds, 486 stitches.
- Round 1 is the middle of the flat base the cat sits on; the open edge is the neck.
- After round 18: Stuff firmly before sewing on, up to the open edge. Do not pack the stuffing hard against the base: it should stay nearly flat.
- FoundationMake a magic ring.
- Rnd 1RS6 sc in MRleaves (6 sc)
- Rnd 22 sc in each st aroundleaves (12 sc)
- Rnd 3repeat: 2 sc in next st, sc in next st 6 timesleaves (18 sc)
- Rnd 4repeat: Sc in next 2 sts, 2 sc in next st 6 timesleaves (24 sc)
- Rnd 5Sc in BLO of each st aroundleaves (24 sc)
- Rnd 6repeat: 2 sc in next st, sc in next 3 sts 6 timesleaves (30 sc)
- Rnd 7Sc in each st aroundleaves (30 sc)
- Rnd 8repeat: Sc in next 4 sts, 2 sc in next st 6 timesleaves (36 sc)
- Rnds 9 to 13Sc in each st aroundleaves (36 sc)Next: round 9 of 13
- Rnd 14repeat: Sc2tog, sc in next 4 sts 6 timesleaves (30 sc)
- Rnd 15Sc in each st aroundleaves (30 sc)
- Rnd 16repeat: Sc in next 3 sts, sc2tog 6 timesleaves (24 sc)
- Rnd 17Sc in each st aroundleaves (24 sc)
- Rnd 18repeat: Sc2tog, sc in next 2 sts 6 timesleaves (18 sc)
- EndFasten off, leaving a 17 in (43 cm) tail. The open edge has 18 stitches. The tail is for sewing it on.
Ear make 2
Yarn A, gray.
- Size at 20 stitches and 22 rounds to 4 in (10 cm): about 1¼ in (3 cm) wide at its widest round and 1 in (2.4 cm) long when flattened. 6 rounds, 48 stitches each.
- Round 1 is the tip; the last round is the edge that is flattened and sewn on.
- After round 6: Do not stuff. Flatten the piece so the last round becomes a straight double edge.
- FoundationMake a magic ring.
- Rnd 1RS4 sc in MRleaves (4 sc)
- Rnd 2repeat: 2 sc in next st, sc in next st 2 timesleaves (6 sc)
- Rnd 3repeat: Sc in next 2 sts, 2 sc in next st 2 timesleaves (8 sc)
- Rnd 4Sc in each st aroundleaves (8 sc)
- Rnd 5repeat: 2 sc in next st, sc in next 3 sts 2 timesleaves (10 sc)
- Rnd 6repeat: Sc in next 4 sts, 2 sc in next st 2 timesleaves (12 sc)
- EndFasten off, leaving a 13 in (33 cm) tail. Press the piece flat: the 12 stitches of the last round make a straight edge 6 stitches long and two layers thick. The tail is for sewing that edge down.
Front leg make 2
Yarn A, gray.
- Size at 20 stitches and 22 rounds to 4 in (10 cm): about ¾ in (1.6 cm) across and 1½ in (3.8 cm) long. 9 rounds, 84 stitches each.
- Round 1 is the closed tip; the last round is the edge that is sewn on.
- Before round 6: Stuff lightly as you go from here, a little every few rounds and up to the open edge: a tube this narrow cannot be stuffed from its end once it is finished.
- FoundationMake a magic ring.
- Rnd 1RS6 sc in MRleaves (6 sc)
- Rnd 2repeat: 2 sc in next st, sc in next 2 sts 2 timesleaves (8 sc)
- Rnd 3Sc in next 2 sts, 2 sc in next st, sc in next 3 sts, 2 sc in next st, sc in next stleaves (10 sc)
- Rnds 4 to 5Sc in each st aroundleaves (10 sc)Next: round 4 of 5
- Rnds 6 to 9Sc in each st aroundleaves (10 sc)Next: round 6 of 9
- EndFasten off, leaving a 12 in (30 cm) tail. The open edge has 10 stitches. The tail is for sewing it on and for the seam down its side (see Assembly).
Hind foot make 2
Yarn A, gray.
- Size at 20 stitches and 22 rounds to 4 in (10 cm): about ¾ in (1.9 cm) across and 1 in (2.7 cm) long. 7 rounds, 76 stitches each.
- Round 1 is the closed tip; the last round is the edge that is sewn on.
- After round 7: Stuff lightly before sewing on, up to the open edge.
- FoundationMake a magic ring.
- Rnd 1RS6 sc in MRleaves (6 sc)
- Rnd 2repeat: 2 sc in each of next 2 sts, sc in next st 2 timesleaves (10 sc)
- Rnd 3repeat: Sc in next 4 sts, 2 sc in next st 2 timesleaves (12 sc)
- Rnds 4 to 7Sc in each st aroundleaves (12 sc)Next: round 4 of 7
- EndFasten off, leaving a 13 in (33 cm) tail. The open edge has 12 stitches. The tail is for sewing it on.
Tail
Yarn A, gray.
- Size at 20 stitches and 22 rounds to 4 in (10 cm): about ½ in (1.3 cm) across and 3 in (7.8 cm) long. 18 rounds, 142 stitches.
- Round 1 is the closed tip; the last round is the edge that is sewn on.
- Before round 6: Stuff lightly as you go from here, a little every few rounds and up to the open edge: a tube this narrow cannot be stuffed from its end once it is finished.
- FoundationMake a magic ring.
- Rnd 1RS6 sc in MRleaves (6 sc)
- Rnd 2repeat: 2 sc in next st, sc in next 2 sts 2 timesleaves (8 sc)
- Rnds 3 to 5Sc in each st aroundleaves (8 sc)Next: round 3 of 5
- Rnds 6 to 18Sc in each st aroundleaves (8 sc)Next: round 6 of 18
- EndFasten off, leaving an 11 in (28 cm) tail. The open edge has 8 stitches. The tail is for sewing it on.
Assembly
- Sew the open edge of the body (18 stitches) to the head, centered on its closed end (its last round). The edge lies along round 19 of the head, which has 18 stitches. Both have 18 stitches: sew them stitch for stitch. Line up the front threads of the two pieces.
- Flatten each ear. Pin the two to the head over rounds 2 to 8 (counted from the start of the head), one on each side, the middle of each 6 stitches from the front line on round 5 (12 stitches apart, of 24 in that round: that is, at the two sides). The flat edge is 6 stitches long and runs up and down across the rounds: one end 3 stitches from the front line on round 2 (of 12 in that round), the other end 9 stitches from the front line on round 8 (of 36 in that round). Both ends are a quarter of the way round from the front line: at the side. They point up and out to the side. Look from the front and from above to check before sewing. Sew the flat edge down through both layers, every stitch. A flattened ear this size may flop. If it does, catch the back of it to the head with a stitch or two, beside the middle of its sewn edge.
- Pin the two front legs to the body over rounds 10 to 13 (counted from the start of the body), one on each side, the middle of each 4 stitches from the front line between rounds 11 and 12, counted on round 12 (8 stitches apart, of 36 in that round). The open edge has 10 stitches and covers about 3 stitches across and 4 rounds up and down. They point down and forward, which is not straight out from the body there, so the edge is sewn on at a slant. The middle of the far end of each comes to lie level with round 6 of the body, 2 stitches from the front line on its own side (of 30 in that round), about 1¼ in (3.2 cm) out from the body there: mark that place on the body with a pin and check the far end against it before sewing. Look from the front and from above to check before sewing. Sew every stitch of the edge to the body. Then, with the same tail, sew the side of each front leg that touches the body down for 3 rounds of the front leg, counted from its open edge, so it stays where it points.
- Pin the two hind feet to the body over rounds 6 to 9 (counted from the start of the body), one on each side, the middle of each 7 stitches from the front line between rounds 7 and 8, counted on round 8 (14 stitches apart, of 36 in that round). The open edge has 12 stitches and covers about 4 stitches across and 4 rounds up and down. They point forward and out to the side, which is not straight out from the body there, so the edge is sewn on at a slant. The middle of the far end of each comes to lie level with round 7 of the body, 4 stitches from the front line on its own side (of 30 in that round), about 1 in (2.6 cm) out from the body there: mark that place on the body with a pin and check the far end against it before sewing. Ease the edge to fit as you sew, so that the far end stays where it is pinned. Look from the front and from above to check before sewing. Sew every stitch of the edge to the body. Sew them on with the cat sitting on the table, so that they rest on it with the base.
- Pin the tail to the body over rounds 6 to 8 (counted from the start of the body), on the back line (straight opposite the front thread). The open edge has 8 stitches and covers about 3 stitches across and 3 rounds up and down. It points back, which is not straight out from the body there, so the edge is sewn on at a slant. The middle of its far end comes to lie level with round 7 of the body, on the back line, about 3 in (7.9 cm) out from the body there: mark that place on the body with a pin and check the far end against it before sewing. Ease the edge to fit as you sew, so that the far end stays where it is pinned. Look from the front and from above to check before sewing. Sew every stitch of the edge to the body. It lies on the table behind the cat; sew it on with the cat sitting on the table.
Finishing
- Work the details below last, after the toy is stuffed and its parts are sewn on, so that each can be judged against what is already there. Stuffing moves things: pin or mark each place first and look from the front.
- Eyes: with dark brown, embroider two on the head, between rounds 10 and 11 (counted from the start of the head), 4 stitches either side of the front line (8 apart, of 42 in that round), each about 1 stitch wide and 1 and a half rounds tall. To make each: bring the yarn up at the bottom, take it down at the top, and lay two or three such stitches side by side until it is the size given; do not pull them tight.
- Nose: with pink, embroider one on the head, between rounds 12 and 13 (counted from the start of the head), on the front line, about 1 stitch wide and half a round tall. To make it: bring the yarn up at one side, take it down at the other side, and lay two such stitches side by side until it is the size given; do not pull them tight.
- Mouth: fine lines. Use embroidery floss in dark brown, or one ply split from the yarn; a whole strand of this yarn would look like rope on a piece this size. Straight stitches on the head: from between rounds 12 and 13, on the front line, to between rounds 13 and 14, on the front line; from between rounds 13 and 14, on the front line, to round 14, 1 and a half stitches from it. A stitch that lies along the front line is made once; every other stitch is made twice, once on each side of the front line.
- Whiskers: fine lines. Use embroidery floss in dark brown, or one ply split from the yarn; a whole strand of this yarn would look like rope on a piece this size. Straight stitches on the head: from between rounds 12 and 13, 2 and a half stitches from the front line, to round 12, 7 stitches from it; from round 13, 2 and a half stitches from the front line, to round 13, 6 stitches from it. A stitch that lies along the front line is made once; every other stitch is made twice, once on each side of the front line. Long stitches catch on fingers: keep each whisker short, or leave the whiskers off.
- Bring both ends of each embroidery yarn out at one place on the back of the piece, knot them and bury them inside.
- Sew each piece on firmly and weave every tail inside the toy.
In all: 9 pieces; 8 sewn joins; 94 stitches of edge to sew; 1,614 stitches (570 in the head, 486 in the body, 48 in each ear, 84 in each front leg, 76 in each hind foot, 142 in the tail); 18 ends to weave in.