Cross stitch guide
Left-handed cross stitch
Left-handed stitchers make the same cross with the same tools. Many either follow the usual instructions with the needle in the left hand, or turn the work half round so that rows run from right to left. Both are right, as long as every top leg leans the same way.
On this page 7 parts
Do you need to do anything differently?
Often not. The cross is the same whichever hand holds the needle, and some left-handed stitchers follow ordinary instructions exactly as written, in rows from left to right. Needles, hoops, frames, cloth and charts are the same for either hand.
If that feels awkward, there is a second way that changes nothing in the finished piece: work each row from right to left.
A row from right to left
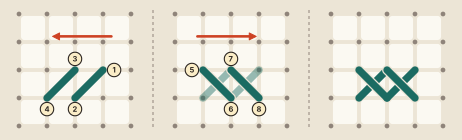
- Start at the right-hand end of the row. Bring the needle up at the top right corner of the first square (1) and take it down at the bottom left (2).
- Move one square to the left and do the same: up at the top right (3), down at the bottom left (4). Carry on to the end of the row.
- Now come back from left to right with the top legs. Up at the top left corner of the last square (5), down at its bottom right (6). Then the next square: up at 7, down at 8.
The crosses that result are the usual ones. This is what an ordinary row looks like when the cloth and the chart are turned upside down, an adaptation often suggested to left-handed stitchers. You can do it either way: turn the work and the chart, or keep them upright and stitch as in the picture.
Which way the legs lean, and whether it matters
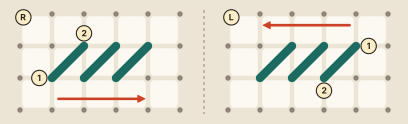
It does not matter which leg lies on top. What matters is that the top leg leans the same way in every stitch of the piece. A piece with all its top legs leaning to the left is as sound as one with them all leaning to the right.
Two things follow:
- Choose one way at the start and keep it. If you change from the usual row to the right-to-left row, check the first cross against the ones you have already made.
- Never turn the work a quarter turn. Turned half round, a cross looks the same and its legs still lean as before. Turned a quarter, its top leg leans the other way, and stitches added from there will not match.
Where to start
Begin where the chart says: usually the center, the same for everyone. Inside the design, start a row at the end you work from. For the right-to-left row that is the right-hand end, and an area is then filled from the bottom up: the usual top-down order, turned half round.
Reading right-handed instructions
- Turn it upside down. For the cross itself, a right-handed diagram turned upside down is a correct left-handed one. That is a half turn, so the legs lean as they should.
- Flip it. A mirror image also works for cross stitch, with one difference: the top legs will lean the opposite way from the diagram. Read "left" for "right" in the words. A diagram photocopied onto clear film and turned over is a ready-made flipped copy.
- Learning from a right-handed person: sit facing them, not beside them. What you see is already mirrored.
For stitches other than the cross, look at the stitch's own page. Where there is a way of working it with the left hand, the page gives it.
Hands and tools
- Two-handed stitching. With the work on a stand, one hand stays above the cloth and one below. Left-handed stitchers do it both ways round, so try each.
- Scissors. Small embroidery scissors usually suit either hand. For cutting cloth, left-handed fabric scissors are worth having.
Where to go next
How to cross stitch teaches the stitch from the first X. Read it once as written, then once with the row turned round as above. Starting a new row shows the move from one row to the next, and Cross stitch tips and techniques gathers the rest. For a first piece, the easy patterns use full crosses only.