Working methods · Beginner
Starting a new row
Work a row of half stitches from one end to the other, then come back along it crossing each one. The pass back ends where the row began, one short step behind the cloth from the first hole of the next row.
How to work it
Work the first pass
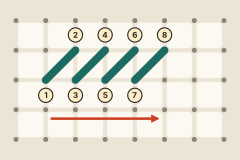
Bring the needle up at the bottom left hole of the first square (1) and take it down at the top right hole (2). Come up through the hole straight below (3) and make the next leg (4). Carry on to the end of the row. You now have a line of half stitches, all leaning the same way.
Come back along the row
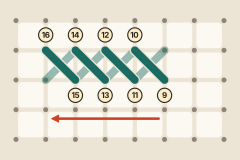
Come up through the hole straight below the last one (9) and cross the last half stitch, going down at its top left hole (10). Work back along the row the same way, crossing each half stitch in turn (11 to 16). The row is finished, and the thread has gone down at the top left hole of the first cross.
Step down to the next row
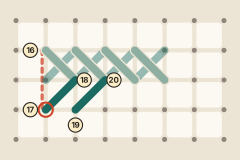
The row below begins at the bottom left hole of its first square (17). That hole is two holes straight down from 16, so the thread makes one short journey behind the cloth. Bring the needle up there and work the new row exactly as before: a pass of half stitches (17 to 18, 19 to 20 and on), then the pass back.
Look at the back
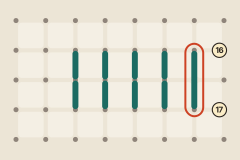
Turn the cloth over now and then. Rows worked there and back leave short upright stitches on the back and nothing else, apart from the one short thread where you stepped from row to row (16 to 17).
In a column, finish each cross as you go
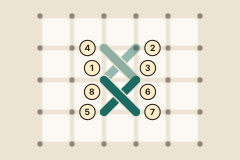
Where a color runs straight up and down, one square wide, make each whole cross before you start the next (1 to 4, then 5 to 8 in the square below). The thread on the back still runs straight up and down, as it does in a row.
At a glance
- Also called
- second row, multiple rows, next row
- Used for
- blocks of one color that run over several rows; keeping the back in short upright stitches
- Top legs
- Every top leg leans the same way, in every row, all through the piece. Which way is your choice.
- Easiest order
- From the top row down. The needle then comes up through empty holes and goes down into holes that already hold a stitch.
- Carrying the thread
- Only a short way. A long thread across bare cloth can show through from the front, a dark one most of all.
Working a row there and back is often called the Danish method, and finishing each cross before the next the English method. Many stitchers use both: there and back for a run of stitches side by side, and one cross at a time for a column or a stitch on its own.
The reason to work downward is the holes. Every hole inside a block of crosses ends up shared by four stitches. Working from the top row down, the needle comes up through the bottom holes of each new row, which are still empty, and goes down into the top holes, which the row above has already used. Coming up through a crowded hole is where threads get split.
The next row can just as well be the one above. The stitch is the same, but the needle now comes up through holes that already hold thread, so bring it up beside the stitches there and not through them. If the hole you need first is the very one the thread has just gone down through, make that leg from its other end. A leg lies the same whichever end it was begun from.
When the next row begins some way off, do not run the thread there across bare cloth. A step of a square or two is nothing. For more than a few squares, fasten off and start the thread again at the new place, or pass it under stitches that are already there.
Tips
- Keep one leg for the first pass and the other for the pass back, whichever end of a row you begin from. That is what keeps the top legs alike.
- Plan the order of the rows so that the next stitch is never far from the last one.
When it goes wrong
- The top legs lean one way in one row and the other way in the next
- A row was begun with the wrong leg. Unpick that row and work it again, first pass and pass back in the same order as every other row. Top legs that lean both ways spoil the even look of the finished piece.
- A dark line shows through the cloth beside the stitching
- A thread was carried too far across the back. Take it out as far as the jump, fasten it off, and start it again where the next stitches are.
Questions
- How do I start the second row in cross stitch?
- Finish the first row by working back along it. Then bring the needle up at the first hole of the next row, which is a short step straight down or up behind the cloth, and work that row the same way.
- Do I work cross stitch rows from the top down or from the bottom up?
- Either gives the same stitches. From the top down is easier, because the needle comes up through empty holes and goes down into the ones already used.
- Should I finish each cross or work in rows?
- Work a run of stitches side by side as a row of half stitches and a pass back. Finish each cross as you go in a column, and for a stitch that stands alone.
- Which leg of a cross stitch goes on top?
- It does not matter which, as long as it is the same one for every cross in the piece.