Cross stitch guide
Cross stitch tips and techniques
Three habits do most of the work: cross every stitch the same way, pull each one snug but not tight, and never leave a knot. This page gathers the techniques beyond that. Some are answered here in full. The rest have a guide of their own, linked with a one-line answer.
On this page 9 parts
Neat stitches
- Cross every stitch the same way. See the next section.
- Pull snug, not tight. A stitch is too tight if it pulls the holes open or puckers the cloth. A hoop or frame that holds the cloth taut makes even tension easier.
- Untwist the thread. Floss twists as you stitch, and twisted strands cover less. Every so often let the needle hang free until the thread stops turning. To lay the two strands side by side on purpose, use railroading.
- Use the right number of strands for the cloth. Too few and the fabric shows between the stitches. Too many and the stitches crowd the holes and look bulky.
- Come up in an empty hole when you can, and go down in one that already holds thread. A needle coming up through a full hole is the one that splits stitches.
Which direction, and which leg on top
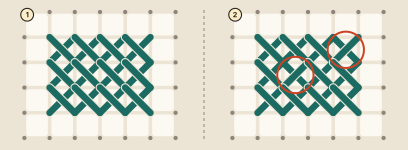
Either leg may go on top. What matters is that it is the same leg in every stitch of the piece (1). A cross made the other way round stands out from its neighbors (2). Most instructions put the leg from bottom left to top right down first and cross it with the other, so that is what most stitchers do. If you are left-handed or simply prefer the opposite, keep to it and the piece is just as sound.
The English and the Danish method
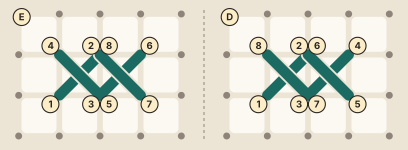
- English (E): finish each cross before you start the next. Up at 1, down at 2, up at 3, down at 4, and the first cross is whole.
- Danish (D): work the first leg of every stitch along the row (1 to 4), then come back along the row crossing them (5 to 8).
The Danish method is the faster of the two along a row, and it keeps every top leg the same without thinking. The English method is the one for a column, for a single stitch standing alone and for stitches scattered here and there. Many stitchers use both in the same piece. Starting a new row shows how one row leads into the next.
Stitching faster
- Work rows the Danish way and stay with one color for as long as it runs.
- Thread several needles before you sit down, one for each color you are about to use.
- Keep the thread short: about the length of your forearm. A long thread tangles.
- Hold the cloth taut in a hoop or frame, so you are not handling fabric with every stitch.
- Mark the cloth. A grid cuts down the counting.
- Or try the sewing method: with the cloth held loosely in the hand, the needle goes down one hole and up the next in a single movement. It is quick, and it gives a little less control over tension than taking the needle straight down and straight up.
Two-handed stitching
With the work on a stand, both hands are free. Keep one above the cloth and one below. The lower hand sends the needle up, the upper hand takes it and sends it down, so no hand has to keep moving from the front to the back. Needles are made for this with a point at each end and the eye in the middle, so they never need turning.
Diagonals and curved lines
A chart is made of squares, so a slanting or curved edge in whole crosses is a staircase. Two things smooth it. Quarter and three-quarter stitches fill a triangle of a square along the edge, which rounds the steps. Backstitch then draws the outline over the top. A line of crosses that touch only at their corners has no row to run along, so each cross is finished whole before the next, like any stitch standing alone.
How shading works
A cross is one flat color, so shading comes from placing close shades of a color side by side. Two tricks make the steps finer. A blended needle carries one strand each of two colors, and from a little distance the two read as a shade between them. And a half stitch lets the cloth show through, which is why backgrounds and soft shadows are often charted in half stitches.
Techniques with a guide of their own
- Start and end a thread: no knot, the end held under stitches. With two strands, use the loop start. First, thread the needle.
- Count: one square is one block, counted from a stitch already made.
- Grid the fabric: a line every ten stitches, to match the chart.
- Choose an order: one color at a time inside a small area.
- Change colors and carry thread: end the thread unless the next stitch is a few squares away.
- Park: for charts where the color changes every stitch or two.
- Keep the back tidy: flat matters, pretty does not.
- Fix a mistake: leave it, cover it, or lift the stitches out with the needle.
- Plan a large project or a full coverage piece.
What comes after the basic cross
The stitches a chart commonly adds to the full cross are the half stitch, backstitch for outlines and lettering, the French knot for dots and eyes, and, for work seen from both sides, double-sided cross stitch. Every cross stitch pattern on this site is charted in full crosses, so none of these is needed to begin.