Cross stitch guide
How to make a cross stitch card
Stitch a small design, tape it face down behind the window of an aperture card, and fold the spare panel of the card over the back to hide it. The design has to be smaller than the window, and the cloth a little larger.
On this page 8 parts
Aperture cards and card blanks
An aperture card is a card blank with a window, the aperture, already cut in its front. The stitching sits behind the window, so the card frames it.
- A three-fold card has three panels. The window is in the middle one. One outer panel folds in behind the stitching and hides its back. This is the kind to choose.
- A two-fold card has no spare panel. The back of the stitching shows inside until you cover it.
Windows are square, rectangular, round or oval. You can also cut your own card from a sheet of card: mark three panels, score the two folds, and cut the window with a craft knife along a metal ruler.
Size the design to the window
Measure the window first. The design has to fit inside it with a little bare cloth showing round it.
A window 3 inches (7.6 cm) wide shows 42 squares of 14 count Aida. A design about 36 stitches wide leaves three bare squares at each side. The fabric calculator, opened on a design of 36 by 36 stitches with the allowance for a card, gives the stitched size and a piece of cloth big enough to hold while you stitch.
After stitching, trim the cloth. It should be at least 1 cm (3/8 inch) larger than the window on every side, and no larger than the panel of the card.
Mount the piece in the card
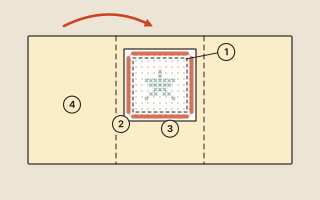
The numbers are the ones in the picture above.
- Press the stitching from the back.
- Open the card and lay it inside up. Put strips of double-sided tape (3) round the window (1), close to its edge but not showing through it.
- Place the piece (2) face down over the window. Lift the card and look from the front. Move the piece until the design is in the middle and its rows are level with the edges of the window.
- Stick one side down, check from the front again, then stick the other three.
- Close the flap. Put tape round the edge of the spare panel (4), fold it over the back of the stitching and press it flat.
On a two-fold card, cover the back of the stitching instead. Cut a piece of card or felt just smaller than the card's front panel and tape it on behind the stitching.
Stitching on cardstock
Cross stitch can go straight onto the card, with no cloth and no window.
- Use heavy card. Thin paper does not stand up to stitching.
- Print the chart at the size you want the stitching, and tape it over the card.
- Lay both on something soft, such as a piece of foam or a folded towel. With a needle, pierce a hole at every corner of every charted square. Neighboring stitches share holes.
- Take the chart off and stitch through the holes. Pull each stitch only snug. As on perforated paper, a hard pull can tear the card between two holes.
Perforated paper is card with the holes already made, a grid like Aida. It is stitched the same way and cut to shape afterward. How to use perforated paper covers it.
Either kind can be the card itself or a panel glued to the front of one. A second piece of card behind it hides the back.
Cutting dies
A cutting die is a shaped cutter. A die-cutting machine presses it through card and cuts the same shape every time, the way a cookie cutter cuts dough. A die in a plain shape, such as a square, a circle or an oval, cuts that shape out of the card, and the hole it leaves is the window. That saves time when you are making many cards. For one card, a craft knife and a metal ruler do the same job.
Common mistakes
- A design too big for the window. Count the squares the window shows before you choose the design, not after.
- A crooked design. Check from the front before any tape is pressed down, and again after the first side.
- Tape that shows. Keep it just outside the edge of the window.
- Cloth trimmed too small. Leave enough past the window for the tape to hold.
Questions people ask
What can I use instead of double-sided tape? A thin coat of craft glue round the inside of the window does the same job.
Can I wash or iron the card? No. Wash and press the stitching before it goes into the card.
Where to go next
The card patterns and the Christmas card patterns are small enough for a card window. For other little makes, see small things to make from cross stitch.