Cross stitch guide
Small things to make from cross stitch
A small finished piece can become a patch, a pin, a keychain, a flat fold or a block that stands on a shelf, or a little wall hanging. Each needs the edge of the cloth made safe from fraying and something behind the stitching: a backing, a board or a block.
On this page 9 parts
Before you start
Stitch the design first and cut the cloth afterward. A larger piece fits in a hoop and is easier to hold. Press the finished piece from the back before you make anything from it.
A patch
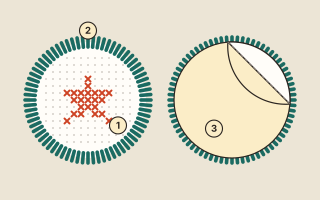
A patch is a piece of stitching with a bound edge (2) and a backing (3) that fixes it to a jacket or a bag.
- Mark the shape round the design, a little way outside it: a circle or a rectangle is easiest.
- Bind the edge. Cover the line with stitches set side by side, so close that no cloth shows between them. Blanket stitch and satin stitch both work by hand. A close zigzag works on a sewing machine.
- Cut it out. Makers differ on the order. Some bind the edge on the marked line and then cut just outside the stitches. Others cut the shape first and bind over the cut edge, which leaves no bare cloth outside the border. Either way, never cut the binding stitches.
- Add the backing. Lay a sheet of iron-on adhesive on the back, paper side up. Press it with a medium iron, following the directions on its pack, and peel off the paper once it is fused.
- Fix it on. Iron the patch in place, or sew it on round its edge. Some makers do both, so that washing cannot lift it.
A pin or badge
- With a felt back. Stitch a small design on plastic canvas and cut it out close to the stitches. Fix a pin back to the back of the piece, and cover the back with felt cut to the same shape.
- In a brooch blank. A blank is a tiny frame with a pin on its back. Measure its opening before you stitch, so that the design fits inside. Afterward, set the stitching in the frame, fasten the spare cloth out of sight behind it, and glue on the back piece.
A keychain
Plastic canvas suits a keychain because it is stiff and does not fray. Stitch the design, then cut round it close to the stitches without cutting them. Back it with felt. Put a jump ring through a hole at the edge of the canvas and join it to a key ring. Cross stitch on plastic canvas covers the stitching.
Keyring blanks work like brooch blanks: the stitching is set into a small frame that hangs from the ring. The keychain patterns are small designs to use for either.
A flat fold
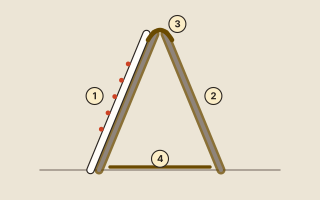
A flat fold is two covered boards joined at the top. It opens like a tent to stand on a shelf and folds flat to store.
- Cut four pieces of mat board, all the same size and a little larger than the stitched design.
- Cut fabric for each board, larger than the board by 1 to 2 inches (2.5 to 5 cm) on every side, so that it folds to the back. Cut one piece a few inches longer still.
- The front (1). Put a layer of batting on one board. Wrap the stitched piece over it and fasten the cloth at the back with glue or lacing.
- The back (2). Cover a second board with the long piece of fabric, so that a flap (3) is left loose at the top.
- Cover the last two boards with fabric. They go on the inside and hide the raw backs.
- Make a narrow strip of folded fabric (4).
- Join the back board to one inner board, wrong sides together, with one end of the strip between them at the bottom. Bring the flap over the top and fasten it between the front board and the other inner board, with the other end of the strip between those two at the bottom.
- Stand it up. The length of the strip sets how far the two halves open. Finish the edges with cord.
The joins can be glued or sewn by hand with ladder stitch.
A block finish
A block finish, also called a cube finish, is the stitching wrapped round a block of styrofoam. It stands on its own, is very light and needs no sewing.
- Choose or cut a block a little bigger than the stitched design.
- Lay batting on the front and back of the block if you want a soft face.
- Center the stitching on the front. Wrap the cloth about 1 inch (2.5 cm) onto each side and push straight pins through it into the foam. The pins stay in.
- Cover the back the same way with plain fabric.
- Wrap a band of folded fabric or ribbon round the four sides to hide the edges and the pins, and pin it where the pins will not show.
A small wall hanging
- Press the piece from the back and trim it, leaving 1 to 2 inches (2.5 to 5 cm) of cloth round the design.
- Fold the edges to the back along the rows of the cloth and press them. Snip the corners so they lie flat.
- Fuse iron-on interfacing to the back, or fix a piece of felt a little smaller than the piece over it.
- Hang it from a loop of cord, or from a cord tied to a dowel across the top.
Common mistakes
- Cutting before the edge is safe. Woven cloth frays as soon as it is cut close. Bind, fold or back the edge first, or cut and bind at once.
- Uneven boards on a flat fold. Cut all four to exactly the same size, or the edges will not line up.
Where to go next
Any small design will do: the small patterns are 700 stitches or fewer. A fridge magnet is made in much the same way as a pin: see how to make cross stitch magnets. For the choices of backing, see how to back a cross stitch, and for raw edges, how to finish cross stitch edges.