Cross stitch guide
Cross stitch on perforated paper
Perforated paper is thin card punched with a grid of holes, nearly always 14 to the inch. You stitch on it as you do on 14 count Aida, in whole crosses and with a light hand, then cut the piece out one hole away from the stitching.
On this page 8 parts
What perforated paper is
Perforated paper is a sheet of thin, stiff card with holes punched in an even grid. Each cross goes over one square of four holes, just as it does on Aida. The paper sold today is nearly always 14 count, so a design comes out the size it would on 14 count Aida: 42 stitches are 3 inches (7.6 cm) wide. Finer and coarser papers are made as well.
It is stiff enough to hold in the hand, so you need no hoop. A hoop would damage it. It does not fray, so there is nothing to hem.
Stitching on punched card is old. The card was first sold in the 1820s, and the fashion for it lasted until about 1910. Bookmarks and mottoes for the wall were made on it.
What it is used for
Small things that should stand stiff by themselves: bookmarks, greeting cards, gift tags and tree ornaments.
What to stitch with
- Needle: a blunt tapestry needle, size 24 or 26. It must pass through the holes easily. A needle that is too big can tear them.
- Thread: three strands of floss cover 14 count paper well.
- Pattern: whole crosses and backstitch. Part stitches would mean piercing the paper between its holes, and that tears it. Every cross stitch pattern on this site is charted in full crosses.
How to stitch on it without tearing it
- Find the front. Some papers have a front and a back. Run a finger over both sides. If one is smooth and the other has a raised rim round each hole, stitch with the smooth side facing you.
- Do not cut the shape out yet. Trim the sheet to a size that is easy to hold, with plenty of paper left round the design.
- Start without a knot, as on cloth. Hold the tail of the thread against the back and catch it under the first few stitches.
- Pull gently. This is the one rule that matters. Draw each stitch flat and stop. A hard pull rips the paper between two holes.
- Keep it flat and dry. A crease in paper stays, and paper cannot be washed. Stitch with clean hands.
If the paper does tear, lay a piece of tape or a scrap of the same paper over the tear on the back, and stitch through both.
How to cut round a finished piece
Cut when the stitching is done, never before.
- Turn the piece over and mark the cut line on the back in pencil if you want a guide.
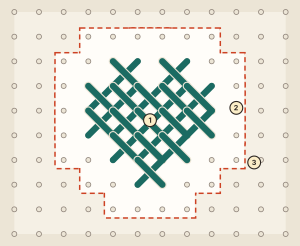
- Leave one whole square of paper between the stitching and the edge (2 in the picture). Cut along the far side of that row of holes (3).
Never cut into a hole that has thread in it. The stitch would come out.
To finish the back, cover it with felt. The guides to finishing ornaments, making cards and making a bookmark go through each one.
Vinyl weave
Vinyl weave, also sold as vinyl Aida, is a stitching surface made of vinyl with a counted grid like the paper's. It is sold in 14 count, among others. It is the insert in stitchable things such as mugs, key rings and rulers, and it is chosen where a piece has to be sturdy. For the stiff plastic mesh that is used for boxes and standing shapes, see cross stitch on plastic canvas.
Questions people ask
Can I use any cross stitch pattern on paper? Any pattern in whole crosses, with or without backstitch. Avoid patterns with quarter and three-quarter stitches.
How big will my design be? On 14 count paper, divide the stitches by 14 to get inches. See 14 count Aida for a size chart.
Do I need to leave a margin? Only one square beyond the stitching, plus enough paper to hold while you work.
Where to go next
The fabric calculator, opened on a design of 42 by 42 stitches, shows the stitched size on 14 count. For designs that suit paper, look through the ornaments and the bookmarks.