Cross stitch guide
Making a pattern in an image editor
An image editor can turn a photo into a grid of colored squares: shrink the picture until it has one pixel for every stitch, cut it down to a few colors, then enlarge it with hard edges. What it cannot give you is thread numbers, symbols or a key. The photo converter here does all of it in one step.
On this page 9 parts
How it works
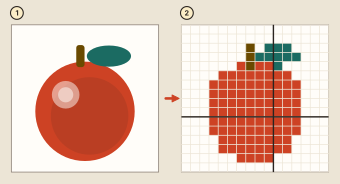
A digital picture is already a grid: a grid of pixels. A chart is a grid of stitches. So the whole method is to make the picture small enough that one pixel is one stitch, and plain enough that each pixel is one of a few colors. Both steps lose detail: a few thousand squares in a handful of colors cannot hold all that a photo does. The aim is to keep the parts that matter.
Step 1: work out the size in stitches
Multiply the size you want by the fabric count. A piece 5 inches (12.7 cm) wide on 14 count is 70 stitches wide. The fabric calculator, opened on 70 by 70 stitches, shows what that comes to on other counts.
Step 2: crop, then shrink to that many pixels
Crop close to the subject first: every pixel given to background is a stitch not given to detail. Then resize.
- Photoshop: Image, then Image Size. Set the units to pixels, keep Resample ticked, and type the width in pixels: 70 for a design 70 stitches wide.
- GIMP: Image, then Scale Image. Type the width in pixels.
The picture is now tiny on screen. That is right: each pixel is a stitch.
Step 3: cut the colors
- Photoshop: Image, Mode, Indexed Color. Type the number of colors in the Colors box.
- GIMP: Image, Mode, Indexed. Choose "Generate optimum palette" and set the maximum number of colors.
Fewer colors give flatter areas and less thread to buy, and they also hold less detail. Try a few numbers and look.
Both programs offer dithering, which scatters pixels of the colors it has to stand in for the ones it lacks. On a stitched piece that softens the bands in skies and skin when seen from across a room, and it speckles the chart with scattered single stitches. Set it to "None" for a simple picture or a first chart. For a photo with soft shading, try it both ways.
Step 4: enlarge with hard edges
To see and print the squares, make the picture bigger again, by a whole number of times: ten times makes each stitch a block ten pixels across.
- Photoshop: Image Size again, with Resample set to "Nearest Neighbor (hard edges)".
- GIMP: Scale Image again, with Interpolation set to "None".
Any other setting smooths the picture as it grows, and the squares blur into each other.
Step 5: lay a grid over it
- Photoshop: set "Gridline Every" to the size of one stitch (10 pixels if you enlarged ten times) under Preferences, Guides, Grid and Slices, then choose View, Show, Grid.
- GIMP: Image, Configure Grid, set the spacing to the size of one stitch, then View, Show Grid.
The grid is a guide on the screen. Photoshop's grid lines do not print. To have lines on paper you must draw them into the picture.
What an image editor cannot do
- Thread numbers. The colors are screen colors. Nothing matches them to real threads: you hold each one against a thread card and choose.
- Symbols and a key. You get colored squares only, with nothing but the color to tell one thread from the next.
- Stitch counts, center marks and pages. There is no thread list, no count of stitches in each color, no mark at the middle, and no split over pages with rows repeated at the joins.
The direct way
The photo to pattern converter does steps 1 to 5 and the three missing things at once. Choose the picture, set the longest side in stitches and the most colors, and download a PDF with a symbol chart, a key of DMC numbers with the stitches in each, and the fabric to cut. The picture is read on your own device and is not uploaded. It can leave a plain background as bare cloth and tidy stray single stitches, and the chart can go on to the pattern maker to be edited square by square.
An image editor is still the right place to improve the photo first. Crop it, brighten it and clean it up there, save it, and then convert it.
Where to go next
How to make a cross stitch pattern covers the other ways to make a chart. How to resize a pattern explains what changing the stitch count or the fabric does to the finished size.