Cross stitch guide
How to resize a cross stitch pattern
A chart is a number of stitches, not a size. To make the finished piece bigger, stitch it on a fabric with fewer stitches to the inch; to make it smaller, use a finer one. The stitches divided by the count give the size in inches. Changing the chart itself is the harder way.
On this page 10 parts
- Change the size by changing the fabric
- What 100 stitches measure on each fabric
- Evenweave and linen: over two, or over one
- What else changes with the count
- Enlarging the chart itself: every stitch becomes four
- Shrinking the chart itself: what is lost
- How to reverse or mirror a pattern
- Enlarging the print is not enlarging the design
- Common mistakes
- Where to go next
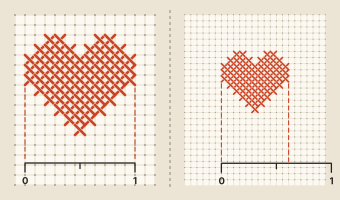
Change the size by changing the fabric
The count of a fabric is the number of stitches it takes to the inch (2.54 cm). The same chart on a different count comes out a different size, with exactly the same stitches and the same detail.
- Bigger: choose a lower count. The squares of the cloth are larger, so every stitch is larger.
- Smaller: choose a higher count.
The arithmetic is one division:
stitches ÷ count = inches
inches × 2.54 = centimeters
Take a design 84 stitches wide and 56 high:
- On 11 count it is 7 5/8 by 5 1/8 inches (19.4 by 12.9 cm).
- On 14 count it is 6 by 4 inches (15.2 by 10.2 cm).
- On 16 count it is 5 1/4 by 3 1/2 inches (13.3 by 8.9 cm).
- On 18 count it is 4 5/8 by 3 1/8 inches (11.9 by 7.9 cm).
The fabric calculator, opened on this design, shows the size on every count and the fabric to cut.
To hit a size you have in mind, work backward: the stitches divided by the inches you want give the count to look for. A design 84 stitches wide that must be about 5 inches (12.7 cm) wide needs about 17 stitches to the inch, so 16 or 18 count.
What 100 stitches measure on each fabric
| Fabric | Stitches to the inch | 100 stitches measure | Tapestry needle | Strands |
|---|---|---|---|---|
| 11 count Aida | 11 | 9 1/8 in (23.1 cm) | Size 22 | 3 |
| 14 count Aida | 14 | 7 1/8 in (18.1 cm) | Size 24 | 2 |
| 16 count Aida | 16 | 6 1/4 in (15.9 cm) | Size 26 | 2 |
| 18 count Aida | 18 | 5 1/2 in (14.1 cm) | Size 26 | 1 or 2 |
| 28 count evenweave or linen, over two | 14 | 7 1/8 in (18.1 cm) | Size 24 | 2 |
| 32 count evenweave or linen, over two | 16 | 6 1/4 in (15.9 cm) | Size 26 | 2 |
Evenweave and linen: over two, or over one
On evenweave and linen each cross usually covers two threads each way, so the stitches to the inch are half the count. A design on 28 count over two is the same size as on 14 count Aida.
Stitched over one thread instead, the same design is half as wide and half as high: the 84 by 56 design is 3 by 2 inches (7.6 by 5.1 cm) on 28 count over one. That is one way to make a very small piece from an ordinary chart.
What else changes with the count
- The cloth to cut. A bigger design needs a bigger piece, plus the margin for finishing.
- The needle and the strands. A lower count wants a bigger needle and more strands to cover the cloth, as the table above shows.
- The thread you need. The amount changes with the size of the stitches. How much floss has the way to work it out as an estimate.
- Nothing in the chart. You follow the same symbols, square for square.
Enlarging the chart itself: every stitch becomes four
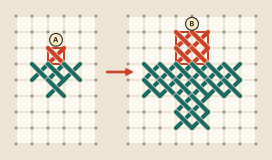
To double a design on the same fabric, turn every square of the chart into a block of four: two across and two down (A becomes B). The design is then twice as wide and twice as high, with four times the stitches. The 84 by 56 design becomes 168 by 112, which is 12 by 8 inches (30.5 by 20.3 cm) on 14 count.
Two ways to do it:
- Stitch each chart square as four crosses. Read the chart as it is and work a block of four for every symbol.
- Stitch one large cross for each chart square, over two blocks of Aida each way, or over four threads of evenweave in place of two. The piece comes out the same doubled size with a quarter of the crosses.
Doubling adds no detail. Curves keep the same steps, only larger. If you want a bigger design that is also finer, it has to be drawn again with more squares.
Shrinking the chart itself: what is lost
A chart cannot be halved the way it is doubled. Four squares would have to become one, and a line that is one stitch wide has nothing to shrink into. Details vanish first: eyes, thin outlines, small lettering.
So to make a design smaller, use a finer fabric if you can. If the chart came from a picture, convert the picture again at a smaller size in stitches with the photo to pattern converter, so that the detail is chosen afresh for that size. Otherwise the design must be redrawn more simply.
How to reverse or mirror a pattern
Mirroring flips a chart so that it faces the other way: a cat that looked left now looks right. Nothing else changes. The mirrored design has the same stitches, the same threads and the same size.
- In a chart program. A program that edits charts can mirror a whole chart, or a part you select, from side to side or from top to bottom. The pattern maker here does both.
- In an image editor. A chart kept as a picture can be flipped there, horizontally or vertically.
- On paper. Trace the chart, or copy it onto clear film, and turn the sheet over. Seen from the back, it is the mirror image.
Leave lettering as it is. Words and numbers flipped from side to side read backward. Mirror the picture, and keep the letters the way they were charted.
Enlarging the print is not enlarging the design
Printing a chart larger, or enlarging it on a copier, makes the symbols easier to read and changes nothing on the cloth. One square is still one stitch. How to print a pattern covers that.
Common mistakes
- Buying fabric before doing the division. Work out the size on your count first.
- Forgetting the margin. The cloth must be bigger than the stitched area on every side.
- Reading 28 count as 28 stitches to the inch. Over two it is 14.
Where to go next
The cross stitch fabric size chart lists common design sizes on every count. If you change the count, check how many strands to use on the new fabric.