Cross stitch guide
How to teach a child to cross stitch
Give the child big squares, a blunt needle with a large eye, a short thread and a tiny design. Set everything up before they sit down, teach one stitch, and stop while it is still fun.
On this page 7 parts
What age to start
There is no rule, and the guides for parents do not agree on a number. What they do agree on is that it depends on the child's hands, patience and interest more than on a birthday, and that a young child needs an adult beside them. A child who is not ready for cloth can practice the up-and-down of a needle on plastic canvas with yarn. Some children are not interested until later, and that is fine: try again in a year.
What a child needs
- Cloth with big squares. Advice differs. Some guides start children on 6 or 8 count Aida, where each square is easy to see and to hit. Others say that many children manage ordinary 14 count. Plastic canvas is a third choice: it is stiff, so it needs no hoop. 8 count and other less common counts and plastic canvas each have a page.
- A blunt needle with a large eye. A tapestry needle is blunt already, which makes it safer than a sewing needle and easy to thread. For a very young child there are plastic needles.
- A short thread. Cut it about 18 inches (45 cm) long. A longer thread tangles.
- A hoop, for cloth. It holds the cloth flat, so small hands can aim.
- A tiny design in a few colors, or no design at all for the first lesson.
A design 20 stitches square comes to 2.5 inches (6.4 cm) on 8 count. The fabric calculator, opened on that design, gives the piece of cloth to cut.
A first lesson, step by step
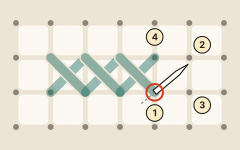
- Set up before the child sits down. Put the cloth in the hoop, cut the thread, thread the needle and fasten the first end yourself. Starting and ending a thread is the part children need help with at first.
- Let them play first. Up through one hole, down through another, anywhere they like. The aim is only to get used to the needle going in and out.
- Show one cross. Come up at the bottom left of a square (1) and go down at the top right (2). Come up at the bottom right (3) and go down at the top left (4).
- Their turn. The child makes the next cross beside yours, then a row of three.
- Check one thing only: the second leg of every cross leans the same way. Leave the rest.
- Stop early. A young child's attention is short, so end the lesson before it runs out. Fasten off the thread for them, and let them show somebody what they made.
Next time, bring a tiny chart. Explain that each square with a symbol is one cross, and that each symbol is one color.
Keep it short and finished
- Small beats ambitious. A child wants to see a finished thing. A row of colored crosses, an initial or a small heart is quick to finish.
- Let them choose. The design and the colors are their decision.
- Expect mistakes and leave most of them. A wrong stitch in a first piece is part of it.
- Stitch alongside them. Bring your own piece and sit with them.
- Consider a stamped piece. With the design printed on the cloth there is no counting, which can suit a young child. Stamped vs counted cross stitch explains the difference.
Safety
Stay with the child whenever the needle and scissors are out. A blunt needle is safer than a sharp one, and it can still hurt.
Questions people ask
Is cross stitch a good first needlecraft for a child? Yes. There is one stitch to learn, the needle is blunt, and the squares of the cloth show where it goes.
The thread keeps tangling. What helps? A shorter thread. Now and then, let the needle dangle from the cloth, and the thread unwinds itself.
Do they need to read a chart? Not at first. Charts come when the stitch is easy.
Where to go next
For a child's first chart, look at the patterns for kids and the Easy patterns, which are four colors or fewer and 1,000 stitches or fewer. How to cross stitch is the stitch itself, written for a beginner of any age.