Needlepoint guide
How to read a needlepoint chart
A chart is a map of the canvas. On most charts each square is one stitch. Find where to start, then count from there.
What the chart shows
A chart from another maker may mark its center and join its pages in other ways than the chart PDFs on this site do, so read its own key and notes first.
On a tent stitch chart, one square is one stitch, which is one intersection of the canvas threads. A square's color and symbol tell you which thread to use. A square with no color and no symbol has no stitch charted. On the charts here the only blank squares are those outside the edge of a shaped piece, such as a round ornament or a stocking. Everywhere else the background is charted like any other color, with a symbol in every square and a line of its own in the key. Whether to stitch any rows beyond the edge of a shaped piece depends on how it will be finished: see needlepoint finishing. A square stitched in white thread is white too, but it carries a symbol.
The key on the first page of the PDF lists each symbol with a thread number, its color name and the number of stitches in that color (on a bargello chart, the number of canvas threads that color covers). The numbers are the color numbers of DMC stranded cotton, the six-strand kind; the thread guide says how to match another thread. The key is on that first page only, so keep it beside you while you work from the chart pages.
The first page also gives the size of the design, in stitches (in canvas threads on a bargello chart) and in inches and centimeters on the one mesh it is charted for. In the notes under the key it gives the least size to cut the canvas for that mesh: the design with two inches (5 cm) of margin already added on every side. The pattern's page on this site gives both sizes at 10, 12, 13, 14 and 18 mesh. Where a design repeats, the chart shows a sample of it, and the size of the design and the size to cut are both for what is charted. For a bigger piece, divide the number of squares you will stitch each way by the mesh, and cut the canvas to that size with two inches (5 cm) more on every side. A belt's chart is a length of belt, so its first page gives no size to cut: it says to cut the canvas for the whole length you will stitch, with two inches (5 cm) of margin at each end and along each side. Size is the count of squares (stitches on a tent stitch chart, canvas threads on a bargello chart) divided by the mesh, so 72 stitches on 18 mesh come to 4 inches (10 cm). The chart is not printed at the size of the stitching, so never measure from the paper.
Heavier lines mark every tenth square, and the numbers along the top and down the left side count the squares from the top left corner. The frame round the chart on each page is as heavy as a tenth line; the tenth lines are the ones that carry a number. A small red arrow above the chart, gray on a black-and-white print, marks the center from side to side, and one at its left marks the center from top to bottom. Where the chart has an even number of squares that way, the arrow points at the line between the two middle squares; where the number is odd, it points at the middle square.
Where to start
Start in the middle, unless the design has a clear edge to count from.
- Cut your canvas with a margin of at least two inches (5 cm) on every side and bind the edges with masking tape. The first page of the PDF gives the least size to cut for the mesh the design is charted for, margin included, and the pattern's page on this site gives it for 10, 12, 13, 14 and 18 mesh. For a belt, the first page gives instead the margin to add to the length you will stitch, at each end and along each side, and the pattern's page sizes only the length of belt in the chart; the belt calculator gives the length to stitch. Mark the top of the canvas on the tape, so that you can keep the canvas the same way up as the chart.
- Find the center of the chart: follow the arrow above the chart straight down and the one at its left straight across to where they meet. On a chart in several pages some pages carry only one arrow or none. The center is on the page with both, or, where a break between pages falls on the center, where the pages with both meet: see Charts in several pages, below. On a tent stitch chart a square is an intersection of canvas threads, so the place where the arrows meet tells you what kind of place to look for at the center of the canvas: a hole, an intersection, or the thread between two intersections. A corner where four squares join is a hole. The inside of a square is an intersection of threads. A line between two squares is the stretch of one thread between two intersections. The picture under these steps shows all three.
- Find the center of the canvas by measuring or by counting threads, take the hole or the intersection nearest to it, whichever the chart calls for, and mark it with thread. For a hole, tie a big knot in one end of a short thread and take the thread down through the hole, so that the knot stays on top. For an intersection, make one small stitch of scrap thread over it. Where the center lies between two intersections, make the small stitch over one of the two and note which of the two squares on the chart it stands for. Leave the marking thread in until your first stitches are made, then take it out. If you would rather draw the mark than tie it, do not use ballpoint pen, and be wary of pencil, which smudges. The kind to try is a fine-tipped permanent marker, and even that needs a test. Test a marker first on a scrap of the same canvas: scribble on the scrap, let the ink dry for 10 to 15 minutes, wet it thoroughly under cold running water, then blot it hard between white paper towels. If any color comes off on the towels, do not use that marker on this canvas.
- Count from the center of the chart to the nearest part of the design and stitch that first, counting squares on the chart and threads on the canvas. From a hole, the four squares that meet at the corner are the four intersections round the hole; from there each further square is one more thread. From a marked intersection, the marked intersection is its own square and the next square is the next thread. It is usual to stitch the design first and leave the background color for last. Stitch lighter colors before darker ones where the order allows: fibers from a dark thread already in the canvas can be pulled through with a light one stitched beside it. Where a light background is left for last, do not run a dark thread across the back of the canvas it will cover: it can show through light stitches as a shadow.
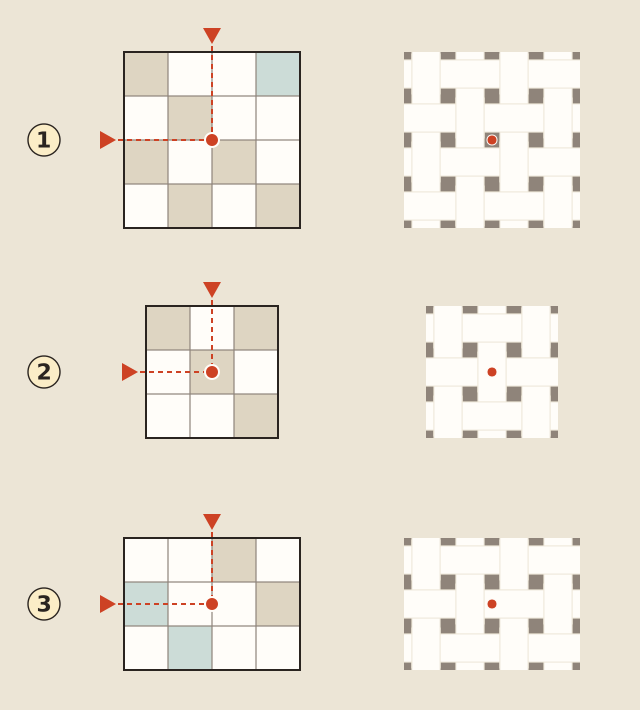
To start from a corner of the chart instead, cut and bind the canvas as in step 1, then measure the margin you allowed, two inches (5 cm) at the least, in from each of the two canvas edges nearest that corner. On a tent stitch chart the intersection nearest to where the two measures meet is the corner square of the chart, which may be a blank square on a shaped piece, and the count starts from it.
How to keep your count
- On a tent stitch chart, count canvas threads, not holes. A tent stitch covers one intersection of threads; how to needlepoint shows how one is made. On Penelope canvas, whose threads run in pairs, a pair counts as one thread when you stitch over the pairs.
- Count a long run in tens by the heavier lines, the ones that carry a number, then add the odd squares at each end.
- Find a reference in what you have already stitched. Where the chart shows a long row passing a column that is already worked, stitch until you are in line with that column, then count only the stitches that remain.
- Cross out rows and columns on the printed chart with a pencil or pen as you finish them.
- A line of basting can mark a counted line on bare canvas: run long stitches of sewing thread along it. Pull the thread out just before the stitching reaches it.
Charts in several pages
A large chart is divided across pages. Its rows are cut into bands, and each band is cut evenly across what is stitched in it: a chart 90 squares wide is two pages of 45 columns, not a full page and a narrow strip. Each page is headed with its number among the chart pages, such as Chart 2 of 4, and the columns and rows it covers. The grid numbers continue from page to page, so if the first page covers columns 1 to 45, the next covers columns 46 onward. The pages run across the chart from left to right, then down.
Where chart pages join, gray squares repeat two rows or columns. A page that continues another begins with the last two columns or rows before it printed again in gray, with their symbols, and its heading says which columns or rows they are. The gray squares keep the numbers they have on that other page. On a black-and-white print, where every color prints as a shade of gray, go by the heading and by their place: they are the first two columns at the left of the chart, the first two rows at its top, or both. They are there to lay one page against the other, so do not stitch them a second time.
The pages cover only the part of a shaped chart that is stitched: the pages of a stocking's leg cover the leg's own columns and not the empty corner beside it. Where a row of plain ground lies near the place a join would fall, the join falls there, so that a figure is not cut in two; the pages are then not all the same height. A part that is wider than it is tall, such as one band of rows across a stocking's leg, may be printed on a page turned on its side, and the first page says which pages are. A small picture at the top right of each chart page shows the outline of the whole chart, with the part on that page dark.
A belt's chart is printed in equal parts, one under the other on one page, which may be turned on its side. Each part has its own heading and numbers, and a part that continues the one above begins with the last two columns of the part above, printed again in gray.
Each arrow is printed only on the pages that its center line crosses, so some pages carry only one arrow and some pages of a large chart carry none. The center of the design is on the page that has both arrows. Where a break between pages falls on the center, as it does where a chart 90 squares wide is two pages of 45 columns, the arrow is at the edge of the chart on the page before the break, and just past the gray squares on the page after it. Two or four pages may then have both arrows, and the center is where those pages meet.
Bargello charts are different
On the bargello charts here one square is one canvas thread along the length of the stitch, and each stitch is an upright line covering several squares, usually four; the first page of the PDF says how many. Across the chart, each column of squares is one line of holes: a stitch comes up in one hole of the line and goes down in another, and the next column is the next line of holes. The chart shows where each stitch begins and ends by its color. A run of one color down a column, as long as the stitch, is one stitch. A run twice that length is two stitches of that color, one above the other, and a shorter run at the edge of the design is a shorter stitch that fills in. A four-way design has four quarters, which meet along the diagonals from the center. In its two side quarters the stitches lie across the canvas, so there a stitch is a run of one color along a row, and it is the rows that are lines of holes. The key of a bargello chart counts the canvas threads each color covers, not the stitches.
These charts have an even number of squares each way, so the arrows meet at a corner where four squares join. On the canvas that corner is a point on an upright thread, halfway between two threads that cross it, with a hole to its left and a hole to its right. Mark either hole with a knotted thread, as for a hole in step 3 above, and note which of the two middle columns it belongs to, the one left of the center or the one right of it. In that column the hole is the line between the two middle squares. From it, count squares up and down as canvas threads, and columns across as holes. On a four-way chart the four squares at the center are in the top and bottom quarters, where the stitches are upright, so the center is marked in the same way and those two quarters are counted from it. The side quarters meet them along the diagonals from the center, and a run cut short by a diagonal is a shorter stitch, as at an edge of the design.
Count the first row carefully, stepping each stitch up or down from its neighbor as charted, often by two threads, and work every later row from it, above or below. See the bargello stitch.