Cross stitch guide
How to finish cross stitch edges
While you stitch, bind the cut edges with a whip stitch, a machine zigzag or a fray-stopping liquid. For an edge that will be seen on the finished piece, turn a hem, pull a fringe, or work a stitched edge over it.
On this page 7 parts
While you stitch
Cross stitch cloth is woven, so a cut edge sheds threads as you handle it. On a small piece you can let it. On a big one, bind the edges before the first stitch:
- Whip stitch by hand, shown below. It needs only sewing thread.
- A machine zigzag or overlock stitch close to the edge.
- A fray-stopping liquid run along the edge. It is a chemical sealant, so allow extra cloth and cut the sealed edge off when the stitching is done.
- Masking tape folded over the edge. It leaves a sticky residue that holds dirt, so the taped edge is cut off at the end too.
Preparing fabric compares these in full. A piece that will be framed needs no edge made to be seen: its edges fold out of sight behind the board.
The rest of this page is for an edge that will be seen: on a bookmark, a towel, a bib or an ornament.
A whip stitch edge
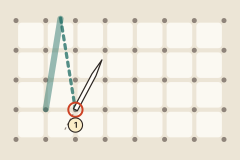
Whip stitch, also called overcasting, wraps the edge in small slanted stitches. The needle always comes up from the same side, so the thread goes over the edge each time.
- Come up a little way in from the edge. Bring the needle up from the back (1), about 1/4 inch (6 mm) in from the edge: three or four blocks of 14 count Aida, or five threads or more of evenweave. Closer than that, and the stitch pulls the last threads off the edge.
- Go over the edge and come up again. Carry the thread over the edge to the back, and bring the needle up one hole along (2), from the back as before. Keep the tension even, and repeat all the way along.
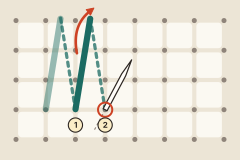
Over a raw edge, this is the binding that keeps cloth whole while you stitch. For a lasting finish, fold a narrow turning to the back first and whip over the fold, with the stitches close and even.
A hem
A hem is the edge folded to the back and sewn down. Folded twice, it shuts the cut edge inside, so it cannot fray. On Aida, fold a narrow turning, 1/4 to 1/2 inch (6 to 13 mm), along one row of blocks, so the fold is straight, and press it. Fold again, then sew the hem down with small stitches: backstitch through all the layers is the plain way.
A blanket stitch edge
Blanket stitch holds a hem and decorates it at once. Each stitch is an upright bar into the cloth, and the thread runs along the very edge from one bar to the next. Blanket stitch is taught step by step in the embroidery section.
A fringe
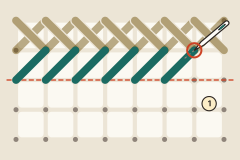
A fringe is the cloth's own threads, left hanging. It is the classic finish for a bookmark.
- Hold the edge first. Work a line of stitches across the cloth where the fringe is to begin (1). A half stitch in every block is the simple way. Without that line, the fringe goes on unraveling into the design.
- Trim, then draw out the cross threads. Cut the cloth straight, as far below the line as the fringe is to be long. Then, with a needle, lift out the threads that run across (2), one at a time, starting at a corner. The threads that are left hang free.
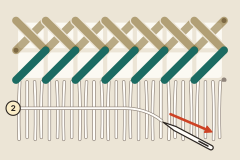
Making a bookmark uses this finish from start to end.
A crocheted edge
Crochet needs something to hook into. The usual way is to sew a row of blanket stitch along the hemmed edge first. Its loops lie along the edge, evenly spaced, and the first row of crochet is worked into them. From there any crochet border will do. The crochet section has the stitches.
Which edge for which piece
- A bookmark: a fringe, or a hem with blanket stitch.
- A towel, a bib or anything that will be washed: a hem, which shuts the cut edge inside. See also Aida band.
- An ornament or a patch: the edge is finished together with the back: see how to back a cross stitch.
- A framed piece: nothing to see. The edges fold behind the board.