Cross stitch guide
Preparing fabric for cross stitch
Cut the cloth a few inches larger than the design on every side, bind the cut edges so they cannot fray, and find the center. Stiff Aida softens if you rinse the starch out. For a small piece, cutting to size is all you need.
On this page 8 parts
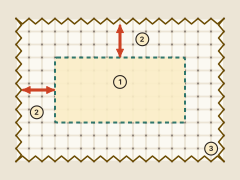
Cut the cloth to size
A piece of cloth is the design (1) plus a margin on every side (2).
- Find the stitch count. A pattern gives its width and height in stitches.
- Turn stitches into inches. Divide each number by the count of the cloth. A design of 100 by 80 stitches on 14 count is 7 1/8 by 5 3/4 inches (18.1 by 14.5 cm).
- Add the margin, twice. Once for each side. How much depends on how the piece will be finished, and on who you ask: advice runs from 2 inches (5 cm) a side to 3 or 4 inches (7.5 to 10 cm) a side. A framed piece wants the most, because the cloth is stretched over a board. A piece for a hoop or an ornament can have less.
- Cut straight. Follow one line of holes on Aida, or one thread on linen, so that the edges run square with the weave.
When in doubt, cut bigger. Spare cloth can be trimmed away at the end. Cloth that was cut too small cannot be put back, and cutting too small is a common mistake.
The fabric calculator, opened on 100 by 80 stitches on 14 count, does the sum. It allows 3 inches (7.5 cm) a side for framing and rounds up, which makes that piece 14 by 12 inches, or 34 by 30 cm if you work in centimeters. It allows less for a hoop or an ornament.
Stop the edges fraying
Cross stitch cloth is woven, and a cut edge sheds threads as it is handled. Linen and evenweave fray faster than Aida. The edge that is bound in the picture is marked 3.
| Way | How | Worth knowing |
|---|---|---|
| Machine stitch | A zigzag or overlock stitch close to the edge | The most secure; best for a long project |
| Hand stitch | Whip stitch over the edge, or fold a narrow hem and tack it | Needs no machine; slow on a large piece |
| Liquid seam sealant | A thin line along the edge, left to dry | Quick, with no sewing; it leaves the edge stiff |
| Masking tape | Folded over the edge | Quick, but the glue leaves a residue: cut the taped edge off, never peel it, and allow for that when you cut |
| Pinking shears | Cut the edge in small teeth | Slows fraying but does not stop it |
| Nothing | Leave the edge raw | Fine for a small piece that is finished in a few sittings |
Whichever you choose, the binding is there for the stitching only: the edge is usually trimmed off or hidden when the piece is finished. Finishing edges covers the edge that stays.
Press out creases
Cloth often arrives folded. A warm iron takes the fold lines out and gives a flat piece that is easier to hoop evenly. Not everyone bothers: the cloth is creased again by the hoop and by handling, and the finished piece is pressed in any case. Press before you start if the creases get in your way.
Soften stiff Aida
Aida is stiffened with starch. Many stitchers like it that way: stiff cloth is easy to count, and can be stitched in the hand.
If yours is too stiff to enjoy, wash the starch out. Bind the edges first, so that the wet cloth does not fray. Soak it in cool or lukewarm water, rinse it, press the water out without wringing, dry it flat, and iron it. It will be softer and floppier, so use a hoop afterward.
Whether to wash cloth before stitching for other reasons, such as shrinking or loose dye, is a question of its own: see how to wash cross stitch.
Selvage and grain
The selvage is the finished edge on each long side of a length of cloth, made as the cloth is woven. It is woven tight and does not fray. The lengthwise threads of the cloth, the warp, run parallel to it. The threads that cross them are the weft.
A cut piece may still have selvage on one edge. That edge needs no binding. Cloth that was printed after it was woven has a right side, the printed one: check before you start.
Find the center, then start
Fold the cloth in half one way, then in half the other way. The point where the folds meet is the center. Mark it with a pin or a single stitch. How to start a cross stitch goes on from there, and gridding is worth the time on a large design.
Questions people ask
Do I have to prepare the cloth at all? For a small, quick piece: cut it with a margin and begin. For anything that will be handled for weeks, bind the edges too.
How much margin do I need for a hoop? Less than for a frame. About 2 inches (5 cm) on every side is the usual advice, which leaves enough cloth to gather behind the hoop.
Should I wash the cloth first? Usually not. Wash it first only to soften it, or when the washing guide says the cloth calls for it.
Next
Work out your piece with the fabric calculator, cut it, bind it, and make the first stitch.