Cross stitch guide
How to make a cross stitch bookmark
Stitch a long, narrow design on Aida band, on Aida cut to size or on perforated paper, about 2 to 3 inches (5 to 8 cm) wide and 7 to 8 inches (18 to 20 cm) long. Then stop the edges fraying: fringe the ends, or fold the edges in and sew a backing behind.
On this page 7 parts
What to stitch a bookmark on
- Aida band. Also called stitching band: Aida or linen woven as a narrow ribbon, with its two long edges already finished, sold in several widths. Only the two short ends are left to finish. Aida band and stitchable ribbon says more.
- Aida or evenweave cut to size. Any offcut will do. All four edges are raw, so all four need finishing.
- Perforated paper. Stiff paper punched with holes like Aida. It does not fray, so it is simply cut to shape. It is fragile: it tears if the thread is pulled hard, it creases if it is bent, and it cannot be washed or ironed. It suits a bookmark that will be handled gently. See how to use perforated paper.
Bookmark blanks are sold too. A blank is a length of band made ready to stitch, with its ends already finished, so the stitching is all that is left to do.
The size to stitch and cut
A finished bookmark is about 2 to 3 inches (5 to 8 cm) wide and 7 to 8 inches (18 to 20 cm) long. On 14 count, a design 28 stitches wide and 98 high comes to 2 by 7 inches (5.1 by 17.8 cm).
On cloth cut to size, add what the finish needs. A bookmark whose edges are folded in needs cloth to fold: about half an inch (1.3 cm) on every side. A fringed one needs the length of the fringe at each end. The fabric calculator, opened on a design of 28 by 98 stitches with half an inch to fold, gives the size to cut.
Stitch first and cut afterward. A larger piece is easier to hold and fits in a hoop.
A bookmark lies between pages, so keep it thin. Every extra layer makes it thicker.
Finish the ends with a fringe
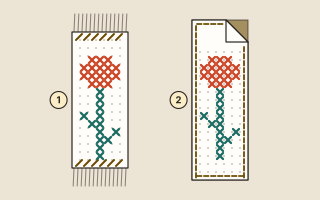
This is the bookmark numbered 1 in the picture. It has no backing, so it stays thin.
- Hold the edge. Work a row of stitches across the cloth, a little past the last row of the design. A row of half stitches does it, and so does a hemstitch. Use thread the color of the cloth. Without this row the fringe keeps unraveling into the design.
- Trim. Cut the cloth straight across, as far past the row as the fringe is to be long.
- Pull out the threads. Starting at a corner, loosen one cross thread with the needle and draw it out. Go on, a thread at a time, until you reach the row of stitches.
On Aida band, fringe the two ends only. On cloth cut to size, work the row of stitches round all four edges and fringe all four.
Finish with a backing
This is the bookmark numbered 2. The backing hides the back of the stitching and holds the edges.
- Press the stitched piece. Trim it and cut a thin backing fabric to the same size.
- Deal with the raw edges. Makers do this in two ways. Some leave about half an inch (1.3 cm) past the design, cut away the corners so they fold flat, and fold the edges of each piece to its wrong side, with one or two blocks of Aida left showing past the design. That is the bookmark in the picture. Others cut both layers to the finished shape with pinking shears and fold nothing.
- Hold the two pieces wrong sides together and pin them.
- Sew round the edge through both layers, in thread the color of the cloth, by hand or by machine. By hand, backstitch in two strands works well.
Two other ways are in use. Iron-on interfacing pressed to the back holds the threads of the cloth and hides the back of the stitching. Or stitch a second design as the back and join the two the same way, which gives a bookmark with two faces. A double-sided cross stitch needs no backing at all, because its back looks like its front.
Common mistakes
- Fringing before the edge is held. Work the row of stitches first, every time.
- A thick bookmark. A heavy backing or a folded hem on all four sides adds bulk. Choose a thin backing fabric or fringe the ends instead.
- A messy back with no backing. Carried threads and tails show on a bookmark that is seen from both sides. Keep the back neat, or cover it.
Questions people ask
Does a bookmark need a backing? No. A fringed bookmark with a tidy back is finished as it is. A backing is for hiding the back and for edges that are folded in.
Can I wash a bookmark? One stitched on cloth, yes, in the same way as any cross stitch. One on perforated paper, never.
Where to go next
Choose a design from the bookmark patterns, which are charted long and narrow. For more ways to treat a raw edge, see how to finish cross stitch edges.