Cross stitch guide
How to back a cross stitch
A piece needs a back when its back will be seen or handled: an ornament, a patch, a hoop on the wall, stitching on clothes. Felt sewn on around the edge is the easy choice. Fabric and iron-on interfacing are the other two.
On this page 6 parts
When a piece needs a back
A back hides the thread ends, keeps them from catching and wearing loose, and gives a neat finish to something that will be turned over in the hand.
- Needs one: ornaments, patches, bookmarks, and stitching on clothes that will be worn and washed.
- Looks better with one: a piece finished in a hoop, above all one you are giving away.
- Does not need one: a framed piece. The frame's own backing board covers it.
The three choices
| Backing | Good for | How it is fixed |
|---|---|---|
| Felt | Hoops, ornaments, patches | Sewn on around the edge, or glued |
| Fabric | Ornaments, pillows, bookmarks | Sewn to the piece and turned right side out |
| Iron-on interfacing | Clothes, patches, anything that needs body | Fused to the back with an iron |
Felt
Felt is the easy one because its cut edge does not fray: it needs no hem.
- Cut the felt to shape. Lay the piece, or the hoop's ring, on the felt and draw around it. Cut just inside the line, so the felt is a little smaller than the piece and a narrow border of cloth shows.
- Pin it to the back so it cannot shift.
- Sew around the edge. Use whip stitch, which is small slanted stitches over the edge, or blanket stitch for a decorative edge. With every stitch, catch a few threads of the cloth under the felt. Keep the stitches even.
- Fasten off with a small knot, and hide the end of the thread under the felt.
Thread the color of the felt makes the stitches disappear. A contrasting color makes them part of the look.
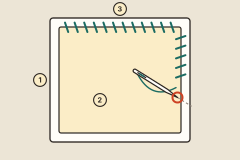
Felt can also be glued on: fabric glue around the back of the piece, kept well away from the stitched area, with the felt pressed on and left to dry. It is quicker. The cost is that glue is very hard to undo, while a sewn back can be unpicked.
Fabric
A fabric back is sewn, not stuck. For an ornament or a small pillow, cut the backing fabric to the same size as the stitched piece. Pin the two with their right sides facing. Sew around the edge, leaving a gap. Turn the whole thing right side out through the gap, fill it if it is to be filled, and sew the gap closed. Plain cotton fabric works well.
Fabric frays where felt does not, which is why its edges are sewn inside. Finishing ornaments and making a pillow go through it step by step.
Iron-on interfacing
Fusible interfacing is a thin layer with heat-activated adhesive on one face. An iron fixes it to the back of the work. It does two jobs:
- On clothes, it covers the back of the stitching, so that the thread ends are protected in the wash and do not scratch the skin.
- On a piece that needs body, it stiffens the cloth. A heavier interfacing or a piece of cardstock does the same inside an ornament or a bookmark.
How to put it on:
- Finish and press the piece first. Wash out anything that is going to be washed out.
- Cut the interfacing slightly larger than the stitched area.
- Lay it adhesive side down on the back of the work.
- Press and hold the iron for a few seconds, lift, and move on until every part has been pressed. Follow the instructions that come with the interfacing for heat, steam and a press cloth, since kinds differ.
Know this before you choose it: it is not meant to come off again. Try a scrap first, and take care with metallic thread, which a hot iron can melt.
A patch can take an iron-on backing in the same way. Small finishes covers patches.
Where to go next
A back usually goes with an edge: how to finish cross stitch edges covers hems, fringes and stitched edges. For the commonest use of a felt back, see how to finish cross stitch in a hoop.