Cross stitch guide
How to fix cross stitch mistakes
A miscount is the mistake every stitcher makes sooner or later, and many can be left, covered or worked round. When stitches do have to come out, lift them one at a time with the blunt needle, last stitch first. The cloth recovers.
First decide whether to fix it
Stop and look at the piece from arm's length. Then choose the mildest cure that works.
| What happened | What to do |
|---|---|
| One stitch in the wrong square, and it does not look wrong | Leave it |
| A stitch was missed | Add it |
| A stitch or two in the wrong color | Stitch over them in the right color, or take them out |
| A row or motif one square out, touching nothing that must line up | Add or drop a stitch where it joins the rest, so the slip is absorbed |
| The miscount throws off a border, lettering or anything that must meet | Take the stitches out, back to where the count is right |
If you cannot see where the count went wrong, do not guess. Count from a part you are sure of until the chart and the cloth disagree. Everything after that point comes out.
How to take stitches out (frogging)
Stitchers call it frogging. The usual explanation is the sound of "rip it, rip it". Done gently, it is safe for the cloth.
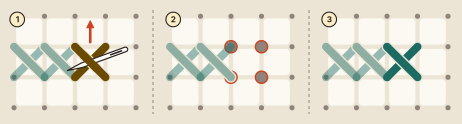
- Use the needle you stitch with. Its blunt tip slides under a stitch.
- Start with the last stitch you made. Slide the needle under its top leg and lift (1). The leg comes up in a loop. Pull the loop until that leg is free.
- Do the same to the bottom leg, then move to the stitch before it. Work back in the order opposite to the one you stitched in.
- Stop when you reach stitches that are right.
- Check the neighbors. An end of another color that was tucked under the stitches you removed is loose now. Tuck it under stitches that are staying.
When there is a lot to remove
For a large patch, lifting stitch by stitch is slow. The quicker way is to cut: slide a seam ripper or the tip of small scissors under the stitches on the front, snip them, and pull the cut pieces out from the back. Keep the cloth taut and go slowly. The blade that cuts floss will cut the cloth just as well, and a slip can leave a hole.
A cut thread in the cloth is not the end of the piece. Guides show it mended in two ways: by weaving in a thread drawn from the edge of the fabric, or by stitching through a patch of the same cloth laid behind the hole.
The marks left behind
The holes a stitch used look bigger after it is pulled out (2 in the picture). That is normal. If one bothers you, nudge the threads of the cloth back into place with the tip of the needle. New stitches fill the holes (3), and once the finished piece is washed and pressed the place is hard to find.
Thread that has been pulled out can leave a little fluff in the cloth. Lift it off before you stitch there again: a soft toothbrush does it, and so does a dab of sticky tape.
Running out of room
If the design is heading for the edge of the cloth, count before you do anything else: the squares still to stitch in that direction on the chart, and the blocks left on the cloth.
- The design fits but the margin is thin. Choose a finish that needs less. The fabric calculator on this site allows 3 inches (7.5 cm) a side for framing, 2 inches (5 cm) for a hoop and 1.5 inches (4 cm) for an ornament or card.
- The design does not fit. More cloth has to be added, or the piece begun again. Joining fabric covers the first.
It is prevented at the start: begin from the center of the cloth and the chart, and cut the cloth with margin to spare. The fabric calculator, opened on a design of 100 by 80 stitches, gives the size to cut for your own numbers.
Where to go next
The way to frog less is to miscount less. How to count cross stitch and gridding the fabric are the two cures. A small pattern keeps every count short while the habit forms.