Cross stitch guide
Gridding cross stitch fabric
Gridding is marking the cloth with a line every ten stitches, so that it matches the heavier lines a chart has every ten squares. You then count from the nearest line, never from the far side of the design.
On this page 8 parts
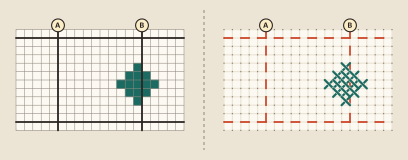
What a grid does
A chart is ruled with a heavier line every ten squares (A and B in the picture). Put the same lines on the cloth and every ten-by-ten square of the chart has its twin on the fabric. A stitch that is 37 squares from the last one becomes three lines and seven squares. And a miscount shows up inside one square, while it is still quick to put right.
Three ways to grid
A basted thread. A line of running stitches along every tenth row of holes, across and down. Use a thread the needle cannot split: a fine, smooth nylon line, the kind sold for fishing or for this very job. Ordinary sewing thread and floss can be pierced by the needle as you stitch, and a pierced grid thread is caught under the crosses and will not pull out. A thread grid can be in whatever color shows up against the cloth, dark cloth included, and it leaves nothing to wash away.
A line drawn with a pen. Quicker to put in. See the section on pens below before you choose one.
Cloth sold with a grid. Some Aida is made with a line every ten squares that washes away in water when the piece is done. It saves the work of gridding, and it comes in fewer colors than plain Aida.
How to grid, step by step
- Find the center of the cloth by folding it in half both ways, and find the center of the chart from the marks on its edges.
- On the chart, count from the center to the nearest heavy line, across and then down. Count the same number of blocks from the center of the cloth. That is where the first line of each direction goes.
- Mark that line from one edge of the design to the other, and a little beyond.
- Count ten blocks and mark the next. Count again before you mark: one line a block out throws off everything after it.
- Carry on to both sides, then do the same in the other direction.
You do not have to grid the whole cloth before the first stitch. Many stitchers put in one line each way through the center and add more only where they are needed.
Pens and markers for fabric
- A water-soluble marker draws a line that comes out in water. The finished piece then has to be washed, so use it only with thread that can be washed, and follow the directions that come with the pen: some lines need a soak.
- A heat-erasable pen draws a line that vanishes with warmth. Faint ghost marks can stay behind, and the line can come back if the piece gets very cold.
- A pencil may not rub out completely, and it can smudge onto the work.
Whatever you choose, try it first on a scrap of the same cloth, and take the line out the way you plan to at the end. Cloth differs, and a pen that leaves one fabric clean can mark another.
Taking the grid out
Pull a thread grid out when the stitching is finished, or a length at a time as the stitching reaches it. A smooth line slides out from under finished crosses. An ordinary thread should come out before you stitch over it. Wash out a water-soluble line as its maker directs.
When it is worth it
Gridding earns its time on a large piece, on a design stitched edge to edge, and on long runs of one color where there is nothing nearby to count from. A small motif counted out from the center does not need it.
One caution
Do not fill the grid one square at a time. Where every row stops on the same line, the edge of each square can show in the finished piece as a faint checkerboard, most of all in a field of one color. Let your rows run across the lines, and end them in different places.
Where to go next
How to count cross stitch covers counting without a grid. How to read a cross stitch pattern explains the chart's lines and center marks. A grid is the usual first step for the parking method and for large projects. To plan on paper first, print graph paper for 14 count, which is ruled with the same heavy line every ten squares.