Cross stitch guide
How to count cross stitch
One square of the chart is one stitch on the cloth: one block of Aida, or two threads of evenweave or linen. Count squares on the chart from a stitch you have already made, count the same number of blocks on the cloth, and stitch there.
On this page 6 parts
What you are counting
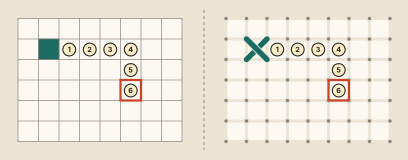
On the chart you count squares. On Aida you count the woven blocks: one block is one square, and so one stitch. Count the blocks themselves, not the holes at their corners.
On evenweave and linen a stitch usually lies over two threads, so two threads each way are one square. Count them in pairs.
In the picture the next stitch is four squares to the right of a finished one and two squares down. Count 1 to 4 across the chart, then 5 and 6 down. Count the same six blocks on the cloth. The sixth is where the stitch goes.
The first stitch: count from the center
Nothing is stitched yet, so there is nothing to count from. Most stitchers begin at the middle. Fold the cloth in half both ways to find its center. The chart marks its own center with arrows or small triangles at the edges: follow them in until they meet. Your first stitch is the one at that meeting point, or the nearest one to it. How to start a cross stitch goes through this slowly.
Every stitch after: count from one already made
- On the chart, find the finished stitch nearest to the one you want.
- Count the squares between them: along the row, then along the column.
- Count the same blocks on the cloth.
- Before the needle goes in, check from a second finished stitch on another side. If both counts land on the same block, stitch.
Mark each stitch off on the chart as you finish it, with a pencil or a highlighter. A chart that shows what is done tells you at a glance what to count from.
Crossing a gap
Mistakes happen most often across long stretches of bare cloth. Four habits shorten the odds:
- Take the shortest way. Count across the narrowest part of the gap, even if that means starting from a different stitch. Better still, work toward the far motif through parts of the design that touch, so that you rarely count over bare cloth at all.
- Count in tens. The heavier lines of the chart fall every ten squares. Count whole tens first, then the few squares left over.
- Mark the landing spot. Slip a pin or a spare needle into the block you counted to, then count again. If the second count lands on the pin, stitch.
- Put in a guide line. For a gap you will cross more than once, baste a line of thread along a row of the cloth and rule the same line on the chart. A whole grid does this for the entire piece.
How to use counting pins
Counting pins are pins sold for this one job: marking the spot you counted to. A counting pin goes between the threads of the cloth and not through them, because its point is rounded like the point of the needle you stitch with. Count from a finished stitch to the place where the next one goes, push a counting pin into the cloth there, and leave it in while you check the count or thread the needle. The pin holds the spot, so you do not have to count that stretch again.
When the count is off
First find out where. Count back from a part you are sure of until the chart and the cloth stop agreeing.
- One stitch, and it does not look wrong: leave it. Few people would ever find it.
- A row or a motif one square out: look at what it touches. Sometimes one stitch added or left out at the join hides the slip, and the design loses nothing.
- Other parts must line up with it (a border that has to meet, lettering that has to be centered): take the stitches out, back to the place where the count is right. How to fix cross stitch mistakes shows how to do that without harming the cloth.
Where to go next
How to read a cross stitch pattern explains the chart's lines, symbols and center marks. Stitching on evenweave and over two covers counting threads in pairs. For practice on a design with short counts, start with one of the small patterns.