Cross stitch guide
How to print a cross stitch pattern
Download the PDF, choose the paper your printer holds (US Letter or A4), and print every page. A chart is not drawn to scale, so either actual size or fit to page will do. A big design comes on several pages that overlap by two rows or columns.
On this page 9 parts
Print a pattern in five steps
- Open the pattern's page and choose the fabric count you will stitch on. The cover of the PDF then gives the right finished size and the fabric to cut.
- Choose the paper. Just above the download button, under "Paper", pick US Letter or A4. US Letter is 8.5 by 11 inches (21.6 by 27.9 cm) and is the usual sheet in the United States and Canada. A4 is 21 by 29.7 cm (8.3 by 11.7 inches) and is the usual sheet almost everywhere else. The page starts on the one your browser's language suggests and remembers what you pick.
- Download the PDF, or use "Print chart" to open it in a new tab.
- In the print window, choose all pages and the same paper size you picked in step 2.
- Leave the scale alone. "Actual size" (100%) prints the page as it was laid out. "Fit" shrinks or stretches it slightly to the area your printer can reach. Both are fine for a chart.
Actual size or fit to page?
For a chart, it does not matter. A chart is a map of stitches, not a drawing at full size. One square is one stitch whether the square prints small or large. The size of the finished piece comes from the fabric count and nothing else.
Blank graph paper is the exception. The printable graph paper is drawn so that its squares match the fabric, 14 squares to the inch (2.54 cm) for 14 count. Print that at actual size, never "fit to page", or the squares will not measure true.
What is on each page
Every Floss Field cross stitch PDF has a cover first: the design, its size, the fabric and thread you need, and the thread key. The chart follows. Every page is numbered at the foot ("2 / 4" is the second page of four), with the pattern's web address beside it. All pages keep a margin of half an inch (1.27 cm).
The chart is fitted to your paper so that it takes as few pages as it can. It may turn the page on its side to do it. The squares print between about 2.5 and 5 mm across (0.1 to 0.19 inch). Each square carries a symbol as well as a tint of its thread color.
Charts split over several pages
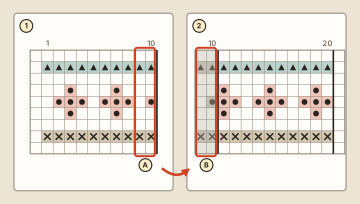
A design too big for one page is cut into parts. Each chart page says at its head which columns and rows it holds, and the cover has a small map of the parts with their page numbers. The cuts fall on a ten-square line where they can.
A later page starts by repeating the last two rows or columns of the page before, in gray (B is A again). Use them to line the pages up, then stitch from the first square that is not gray. You can lay the pages side by side on the table, or tape them together with the gray squares of one page over their twins on the other.
Printing in black and white
A chart prints well without color. Choose "black and white" or "grayscale" in the print window. Two threads may come out the same shade of gray, so read the symbols, not the shades. The key shows each symbol beside its thread number, and that still holds on a gray print.
Making the chart bigger to read
If the symbols are too small for your eyes, enlarge the print, not the design:
- Set a custom scale. Many print windows have a scale box that takes a percentage. A page made bigger than the sheet loses its edges, so go up only a little, or use one of the next two ways.
- Enlarge it on a copier. A copy made bigger, for your own use, is easier on the eyes and gives you a working copy to mark.
- Zoom in on a screen. Open the PDF on a tablet or computer and zoom until the symbols are clear. No paper is needed.
None of these changes the stitched size. To make the finished piece larger or smaller, see how to resize a pattern.
Printing without a printer
- Stitch from a screen. A phone, tablet or laptop shows the same PDF. Keeping your place covers marking a chart on a tablet.
- Have it printed. A copy and print shop will print a file for you, and some public libraries print files sent from your own device. Ask for every page, on Letter or A4 to match the file.
- Print a few pages at a time. Choose a range of pages in the print window, the cover and the first chart page to begin with.
Common mistakes
- Printing only the first page. The first page is the cover. The chart starts on the next one.
- Picking the wrong paper. An A4 file on Letter paper, or the other way round, can lose its edges at actual size. Download the version for your paper, or choose "fit".
- Stitching the gray squares twice. They belong to the page before.
Where to go next
Learn how to read the pattern you have printed, then choose one from all the patterns and print it.