Cross stitch guide
Keeping your place on a pattern
Mark each stitch off on the chart as soon as it is made, and keep a straight edge under the row you are working. On paper that is a highlighter or a pencil and a ruler or magnet strip. On a tablet it is the marking tools of your PDF reader.
On this page 6 parts
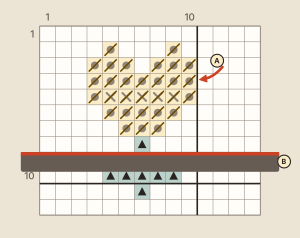
Marking your chart on paper
Work from a copy, not from your only print. A second print or a photocopy for your own use can be written on freely, and the clean one stays clean.
- Mark the center first. Rule a line in colored pen from the arrow at the top to the arrow at the bottom, and another from side to side. Where they cross is where most stitchers begin.
- Mark off what is stitched (A). After each group of stitches, color those squares with a highlighter or strike them through with a pencil.
- Keep a straight edge under the row you are on (B). A ruler does it. So does a magnet board: a thin metal board that holds the chart, with a long flat magnet that slides down one row at a time.
- Work one small area at a time. A block of ten by ten, between the heavier lines, is a natural piece. Finish it, mark it off, move to the next.
When you find a slip, fix it straight away. Every stitch counted from a wrong one can be wrong too, so the longer you wait the more there is to unpick. Count across stitches you have already made when you can: a long jump over bare cloth is the easiest place to miscount.
Highlighters and highlighter tape
A highlighter colors the squares you have stitched, as in step 2. Highlighter tape does the same job without marking the paper. It is see-through, so the symbols show, and it peels off to be used again. It comes in several colors, so each color can have a job of its own.
Marking a chart on a tablet or computer
A chart on a screen needs no printer, and you can zoom in until the symbols are large. Two ways to keep your place:
With a PDF reader's own tools. Open the PDF in a reader that can mark a page. Look for a highlight tool and a draw or pen tool, and choose a see-through color. Mark squares as you stitch them, just as you would on paper. Then save the marked copy, or the marks may be gone next time. Keep the clean download as well.
With Stitch along, on this site. Open a pattern, choose "Edit this chart", and switch to "Stitch along". Tap a stitch to mark it done. "Block" marks the ten by ten block under the last stitch you touched, and pressing a thread in the list shows only that color. You can highlight the row you are on. Progress saves itself as you go. It is kept for that one browser: another phone or computer will not show it.
Protecting a paper chart
- Keep the pages in clear page protectors in a ring binder or folder. They stay flat, in order and clean while you stitch.
- Keep the file. Save the PDF on a second drive as well as the first, so a worn or lost chart can be printed again.
Chart file formats
Charts you download are usually PDF files. A PDF opens in a web browser or a PDF reader, and can be saved and printed from there. Every cross stitch pattern on this site is a PDF, laid out for Letter or A4 paper.
The pattern maker can also save a chart file of its own. That file holds a chart so you can open it again in the pattern maker on another device. It is not a picture and other programs will not read it. For stitching, use the PDF.
Common mistakes
- Marking ahead. Mark a square after the stitch is made, never before.
- Marking the only copy in ink, then wanting to stitch the design again.
- Forgetting to save a marked PDF before closing it.
- Turning the chart and not the cloth. Keep the two the same way up, or turn both upside down together.
Where to go next
If you are not yet sure what the symbols and lines mean, read how to read a pattern. How to print a pattern covers making the working copy. For big designs with many colors, parking threads and large projects go further.