Cross stitch guide
How to mount and lace cross stitch
Stretch the piece over an acid-free board, pin it along the board's edge from the middle of each side outward, then lace the cloth across the back with strong thread: the long sides first, then the short ones.
On this page 6 parts
What you need
- The piece, washed and pressed. See how to wash and how to iron cross stitch.
- A mounting board. Acid-free foam board or acid-free mat board (more under mounting boards, below).
- Pins. Rustproof ones, with heads you can grip.
- Strong thread and a needle. Quilting thread, pearl cotton or doubled floss. It has to be strong, because the lacing is pulled tight.
- A ruler and a sharp craft knife.
How to mount and lace it, step by step
- Cut the board. Make it a touch smaller than the frame's opening each way, so that it still fits with the cloth wrapped around it. Thick cloth needs a little more room.
- Center the piece. Mark the middle of the board and find the middle of the design. Lay the piece face up on the board with the two middles together. Check with a ruler that the border is even on all four sides and that the weave runs straight along the board's edges.
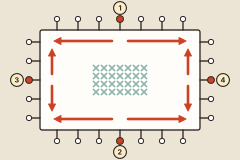
- Pin the middle of each side. Push a pin through the cloth into the edge of the board: the middle of one long side, then the long side opposite, then the two short sides.
- Pin outward from each middle. Work toward the corners with pins at close, even gaps, smoothing the cloth as you go. Stop short of the corners. Pull the cloth flat and taut, never so hard that the stitches stretch. Turn it over often and look at the front.
- Fold the cloth to the back. Turn the board face down. Fold the two long sides over first.
- Lace the long sides. Leave the thread on its spool, since you need a long, unbroken length. Sew from one long flap to the other and back, like a shoelace, with stitches half an inch to an inch apart (1.3 to 2.5 cm). Keep each stitch well in from the cut edge, or the pull will tear it out. Put all the laces in loosely first. Then pull them tight one by one from the fastened end, cut the thread from the spool and fasten off.
- Lace the short sides the same way, across the first lacing.
- Fold the corners flat, the way you would wrap a gift box.
- Take out the pins. Even rustproof pins can rust in time, and the lacing now holds the piece.
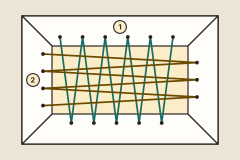
The long sides are laced first (1), then the short sides (2). Lacing pulls from both directions at once, so it takes out the faint lines that washing and ironing leave.
If the front puckers
If the front puckers, or the design looks pulled out of shape, the tension is wrong somewhere. Undo the lacing or the pins on that side, smooth the cloth flat, and fasten it again with a lighter hand. Look at the front after every few stitches.
Other ways to mount, and what each risks
- Pins alone. The cloth is pinned into the edge of a foam board and left that way. It is quick, it is easy to redo, and it suits a first try or a small piece. It needs about 2 inches (5 cm) of spare cloth on every side, or more. The risks: pins can rust in time, and on a large piece they may not hold the tension evenly.
- Self-stick board. This is a stiff board with adhesive on one face. The cloth is smoothed onto it, or folded to the back and pressed onto the adhesive there. It is the fastest mount. Stitchers who mount for the long term avoid it all the same: adhesive is very hard to get off cloth later, and what it does to cloth over many years is the worry. Use it for a piece you do not need to last.
- Tape on the back. Some small pieces are simply taped to the board or to the back of a mat. Never put tape on the cloth of a piece you care about.
Lacing is the one that can always be undone. Cut the thread and the piece comes off its board unharmed.
Mounting boards
The board should be acid-free: acid-free foam board or acid-free mat board. Ordinary cardboard is acidic, and over the years it leaves brown marks on cloth.
A soft layer under the piece is optional. Some stitchers cover the board with thin batting. Others cover it with washed cotton fabric, which is also how museums mount small textiles. Either adds a little padding under the piece.
An old, fragile or soiled piece should not be mounted as it is. Ask a conservator first.
Where to go next
The mounted piece is ready for its frame: how to frame a cross stitch covers mats, glass and frame size. Planning the next piece? The cloth you fold to the back is the margin you allow at the start, and the fabric calculator, opened on a 5 by 7 inch design, adds 3 inches (7.5 cm) a side for it.