Cross stitch guide
How to frame a cross stitch
Wash and press the piece, stretch it over an acid-free board cut to fit the frame, and put it in the frame with a mat or spacers so that any glass stands clear of the stitches.
On this page 8 parts
The steps, from clean piece to closed frame
- Clean and press the piece. Oil from your hands yellows cloth over the years, so wash before you frame: how to wash cross stitch, then how to iron it. Let it dry completely. Until then keep it flat or rolled, never folded.
- Choose the frame size from the size of the design, not the size of the cloth. The section below shows how.
- Mount the piece on a board. Cloth needs a board behind it to stay flat and firm in a frame. It is stretched over a stiff, acid-free board cut a little smaller than the frame's opening, and held at the back with lacing or pins. That has a page of its own: how to mount and lace cross stitch.
- Decide on a mat. A mat is a border of stiff board with a window cut in it. It sets the design off, and it holds the glass away from the stitches.
- Decide on glass. Glass keeps dust and fingers off. It must never rest on the stitching.
- Put it together and close the back. Lay in the glass, then the mat, then the mounted piece. Fix the backing board in place and add the hanger.
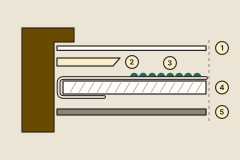
Keep every step reversible. Lacing and pins can come out again years from now. Glue and tape on the cloth cannot.
Choosing the frame size
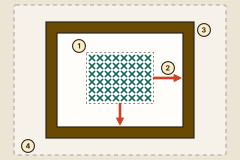
The frame's opening is the design (1) plus the border of bare cloth you want to see around it (2). The cloth beyond that (4) folds over the edge of the board to the back.
Work it out in three moves:
- Find the design's size. Stitches divided by the count gives inches. A design of 70 by 98 stitches on 14 count is 5 by 7 inches (12.7 by 17.8 cm).
- Add the border. Ready-made frames and boards come in standard sizes. In an 8 by 10 inch frame (20.3 by 25.4 cm), that design has a border of 1.5 inches (3.8 cm) on every side.
- Check the cloth. You need cloth past the board on every side to fold back: 1 to 2 inches (2.5 to 5 cm) at the least. This is why the margin is planned before the first stitch. The fabric calculator, opened on this design, adds 3 inches (7.5 cm) a side for framing.
With a mat, the mat's window is the design plus a small border, and the frame is the size of the whole mat. Measure a bought mat's window yourself: it has to be a little larger than the design and smaller than the mounted board behind it.
Frames for finished pieces
A photo frame works if it is deep enough. The recess in the back has to take the board, the folded cloth, and the mat and glass if you use them. For glass with no mat, look for a deep shadow-box frame with spacers. A framing shop will make any size and depth. Ask whether it does conservation framing, which means acid-free boards and mats and nothing stuck to the cloth.
Framing under glass
Stitchers are divided on glass. For it: glass keeps off dust, smoke, kitchen grease and fingers. Against it: glass pressed on the stitches flattens them, and damp can gather inside it and mark the cloth. The answer both sides accept is a gap. A mat or spacers hold the glass clear of the stitching.
- Ordinary glass is fine.
- Non-glare glass is advised against.
- Conservation or UV glass slows fading and costs more.
- Acrylic is lighter and does not shatter, but it scratches.
Pieces with beads or raised stitches are often framed with no glass at all. Without glass, hang the piece out of the sun and dust it gently now and then.
Matting
Choose acid-free mat board. Ordinary cardboard is acidic, and over the years it leaves brown marks on cloth. The same goes for the mounting board and for any tape inside the frame.
An artist's stretched canvas
A stretched canvas, the kind sold for painting, makes a frame with no glass and no mat. Choose one a little bigger than the design, and allow 2 inches (5 cm) or more of cloth on every side to go around to the back. Center the piece, pull the cloth to the back and staple or tack it there: the middle of each side first, then outward, corners last. Pull until the cloth lies flat, never so hard that the design distorts. The sides of the canvas stay on show.
What framing costs
Custom framing is expensive, and framing a piece yourself in a ready-made frame costs less. What drives the price is a frame made to order in place of a ready-made one, the kind of glass (conservation glass costs more than ordinary glass) and the grade of the mat board.
Where to go next
Start with the mount: how to mount and lace cross stitch. For getting it on the wall, see how to hang cross stitch. And if a frame is more than the piece needs, finishing in a hoop is the quick way.