Cross stitch guide
How to iron cross stitch
Lay the piece face down on a thick towel and press the back with a warm iron while the cloth is still slightly damp. The towel lets the stitches sink in, so they are not flattened.
On this page 6 parts
Before you plug in the iron
- Wash first, if the piece is going to be washed. Heat makes a stain or a mark much harder to get out. How to wash cross stitch comes before this page.
- Press while the cloth is slightly damp. Straight after washing is the easy moment. For a dry piece, mist the back with clean water from a spray bottle.
- Make a soft bed. Fold a clean, thick towel on the ironing board. A pale towel that has been washed many times is the safe choice.
- Look at the iron. It should not spit water: a burst of steam can mark the cloth.
How to iron it, step by step
- Lay the piece face down on the towel and smooth it flat with your hands.
- Cover the back with a thin press cloth if you like: a clean piece of plain cotton, such as an old pillowcase. With metallic thread in the piece, always use one.
- Set the iron to warm. Makers' instructions say warm and never hot, or low to medium. Stitchers who press through a cloth often use the cotton or linen setting. When in doubt go lower, and go by the most delicate thing in the piece.
- Press the back. Some stitchers glide the iron and keep it moving. Others press, lift and set it down again. Either way, never let it sit in one place, or the cloth will scorch.
- Leave the steam off to begin with. A dry iron on a damp piece is the cautious way. For a stubborn crease, use steam through the press cloth.
- Let it finish drying flat before you mount or frame it.
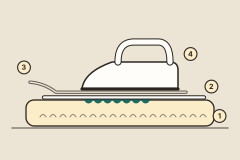
The towel (1) is what protects the stitches. They sink into it under the piece (2) while the press cloth (3) and the iron (4) flatten only the cloth. Never iron the front: it squashes the crosses flat.
Creases and hoop rings
A ring left by a hoop is a crease like any other, only more stubborn. Washing is the surest way to take it out. Without a wash, dampen the ring or use steam, and press it again from the back.
If a line still shows, do not keep ironing harder. Two other things remove it. Blocking does: the damp piece is pinned out square on a board and left to dry. And so does mounting: lacing a piece over a board pulls out the faint lines that washing and ironing leave. How to mount and lace cross stitch shows how. For keeping hoop marks from forming, see hoops and frames.
Beads, metallic thread and printed lines
- Beads. Do not put the iron straight onto beads. Lay the piece face down on padding thick enough for the beads to sink into, and press the back lightly.
- Metallic thread. Some metallic threads are plastic or polyester, and a hot iron can melt or shrivel them. Use low heat, press on the back through a cloth, and test a snippet of the thread first. Metallic thread has more on working with it.
- Printed lines and pen lines that wash out. Wash them out before the iron goes near the piece. Heat makes any mark harder to remove.
- Lines from a heat-erasable pen. Here the iron is what removes them. A faint ghost of the line can stay, and it can come back in the cold, so try the pen on a scrap of the cloth before you trust it.
Pressing the cloth before you start
Stitchers differ on this. Some press new cloth before the first stitch, because a smooth cloth is easier to count on and sits evenly in a hoop. Others skip it, because cloth wrinkles again in the hand and in the hoop.
What to do next
A pressed piece is ready to finish. How to frame a cross stitch takes it from here, and mounting it on a board comes first: how to mount and lace cross stitch.