Cross stitch guide
How to finish a cross stitch stocking
A stitched stocking front is finished with three more pieces of fabric and three seams. Cut a back and two lining pieces to match the front, sew the front to the back, sew the lining with a gap in one side, join the two round the top and pull the stocking through the gap.
On this page 7 parts
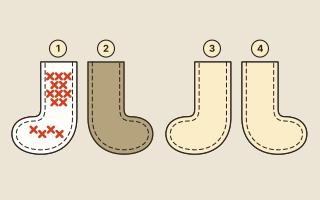
What you need
- The stitched front, washed if it needs it and pressed from the back. See how to wash cross stitch and how to iron it.
- Fabric for the back and for the lining. Plain woven cotton suits both.
- Lightweight iron-on interfacing, to steady the stitched cloth.
- A short ribbon or a strip of fabric for the loop, and a band of fabric if you want a cuff.
Cut the four pieces
- Interface the front. Fuse the interfacing to the back of the stitching.
- Cut the front (1). Cut round the stocking shape, leaving a seam allowance outside it. A quarter inch (0.6 cm) is common. If your pattern gives another, use that for every seam.
- Cut the back (2). Lay the front face down on the right side of the back fabric and cut round it. The back comes out as the mirror image of the front, which is what you want.
- Cut the lining (3 and 4). Fold the lining fabric in two and cut round the front again, through both layers. That gives a pair that face each other.
Sew it in three seams
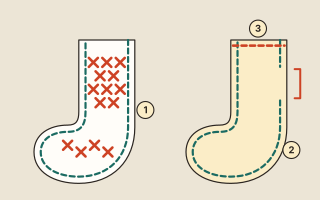
- Seam 1: the stocking. Pin the front to the back, right sides together. Sew all round on the sewing line and leave the top open.
- Clip the curves. Make small cuts in the seam allowance round the heel, the toe and the inner curve of the foot, from the raw edge toward the seam but not through it. Turn the stocking the right way out and iron it flat.
- Add the cuff, if you want one. Sew the band into a ring. Fold it in half with the wrong sides together. Slip it over the top of the stocking, with its raw edges level with the top edge.
- Add the loop. Fold a short ribbon, 4 to 8 inches (10 to 20 cm) long, in half. Pin it at the top of the back seam, the heel side, on top of the cuff if there is one. The loop points down and its two ends are level with the top edge. Placed there, it lies between the cuff and the lining, so the cuff does not cover it when it is folded down.
- Seam 2: the lining. Sew the two lining pieces right sides together, top open. Leave a gap of 3 to 4 inches (7.6 to 10.2 cm) in one side. Clip the curves. Leave the lining inside out.
- Seam 3: the top. Put the stocking inside the lining, right sides together. Match the side seams and the top edges. Sew all the way round the top through every layer.
- Turn it. Pull the stocking out through the gap in the lining, toe first, until everything is right side out. Sew the gap closed by hand. Push the lining down inside the stocking and press the top edge. Fold the cuff down over the outside.
A small stocking with no lining
A little stocking for the tree can be finished with no lining and no turning. Cut the front and a back with a seam allowance. Clip the curves. Fold the allowances under on the front and on the back, the top edges included, and press them. Hold the two wrong sides together and whip stitch them round the edge by hand, leaving the top open. Sew a loop to the back seam.
Common mistakes
- A back cut the same way round as the front. The toes point in opposite directions when the pieces are laid side by side, as in the first picture. Cut with right sides together and they cannot go wrong.
- No gap in the lining. Without it the stocking cannot be turned.
- Curves not clipped. The heel and toe will not turn smoothly.
- A loop pinned pointing up. It ends up shut inside. Point it down, toward the toe.
Questions people ask
Does a stocking need a lining? One that will be used does. The lining covers the back of the stitching and the raw edges of the seams.
What goes on the back? A woven cotton is the common choice. Some stitchers use the same cloth as the front, and others a printed cotton that goes with it.
Where to go next
For a first try, stitch one of the mini stockings and finish it the unlined way. The Christmas patterns have more to stitch for the season. How to finish cross stitch ornaments covers the other small Christmas makes.