Cross stitch guide
How to finish cross stitch ornaments
A cross stitch ornament is usually finished in one of three ways: wrapped over a padded board and backed, sewn into a small stuffed pillow, or set in a small frame or hoop. All three need spare cloth round the design, a backing and a loop to hang it by.
On this page 8 parts
Before you start
Finish the stitching first, then wash the piece if it has picked up marks and press it from the back. Once an ornament holds board, glue or filling it cannot be soaked, so this is the last chance. How to wash cross stitch and how to iron it have the details.
Leave cloth round the design. A common allowance for an ornament is 1.5 inches (4 cm) on every side, which is enough to fold over a board or to sew a seam. The fabric calculator, opened on a design of 40 by 40 stitches with the ornament margin, gives the size to cut.
A padded ornament over board
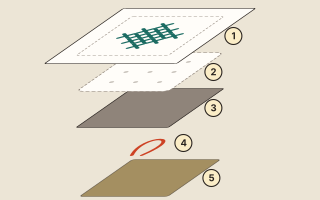
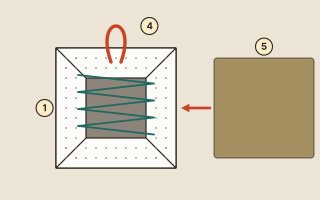
This is the flat, firm ornament with a soft front. The numbers are the ones in the picture above, and the picture after the steps shows the back with the same numbers.
- Cut the board (3). Use mat board or stiff card, cut to the size the finished ornament will be: a little larger than the stitched design.
- Pad it (2). Glue a layer of quilt batting or thin foam to one face of the board. When the glue is dry, trim the padding level with the edges.
- Center the stitching (1). Lay the piece face down and set the board on it, padded side down. Turn it over and check that the design sits in the middle.
- Fold the cloth to the back. Makers differ on the order. Some fold in the corners first and then the four sides. Others fasten two opposite sides first and then the other two, and cut away the spare cloth at the corners so that less of it bunches there.
- Fasten it. Either lace it, with a strong thread that runs back and forth between two opposite sides, or glue the cloth down a side at a time. Glue sets fast, so check that the design is centered before each side goes down.
- Add the loop (4). Fold a short length of ribbon or cord into a loop and fasten its ends to the top of the back, with a few stitches or with glue.
- Cover the back (5). Glue a piece of felt over the back and trim it to the shape. The other way is to cover a second board with fabric and join the two boards back to back.
- Hide the join. A cord glued or sewn round the edge covers the line where front and back meet.
A stuffed pillow ornament
This is the soft ornament, sewn like a tiny pillow.
- Trim the stitched piece and cut a backing fabric to exactly the same size.
- Fold a ribbon into a loop. Pin it to the right side of the stitching at the top, with the loop pointing down toward the design and its ends at the edge.
- Lay the backing on top, right sides together, and pin.
- Sew round the edge, by machine or by hand in backstitch. Leave a gap of 1 1/2 to 2 3/4 inches (4 to 7 cm) in one side.
- Trim the seams and cut across the corners, without cutting the stitches.
- Turn it right side out through the gap. Push the corners out with something blunt, such as a knitting needle.
- Stuff it with polyester filling. Push it into the corners with the same blunt tool.
- Close the gap by hand with ladder stitch. It runs from one fold straight across to the other and back, and it all but vanishes when the thread is drawn tight.
Two stitched sides joined by hand
When the front and the back are both stitched, they can be joined with no seam at all. Work a line of backstitch round each design. Fold the spare cloth under along that line. Hold the two pieces back to back and whip the two backstitch lines together, stitch for stitch: pass the needle under a backstitch on one piece and under the matching backstitch on the other, then move on to the next pair. The needle never goes through the cloth. Leave a gap to stuff it, or leave it flat. Backstitch is the stitch for the outline.
Ornament frames and holders
Small frames and holders are sold ready to take a stitched piece. The usual kind works like this: a thin board comes out of the frame, the stitching is wrapped round it or mounted on it and fixed at the back, and the board goes back into the opening. Cut any board of your own to fit the opening exactly.
A small hoop does the same job with no board. The spare cloth is gathered at the back and covered with a circle of felt. How to finish cross stitch in a hoop shows it step by step.
Common mistakes
- The design ends up off center. Look at the front before the last sides are fastened.
- Bumps show on the front. Spread glue thinly and evenly. Thick glue leaves ridges and seeps out at the edges.
- Thick, rounded corners. On a board ornament, cut away the spare cloth at the corners or fold it in neatly. On a sewn ornament, cut across the corners before turning.
- Empty corners on a pillow. Push filling right into each corner before you fill the middle.
Questions people ask
What do I back an ornament with? Felt is the usual back for a flat ornament. A stuffed ornament is backed with a piece of fabric cut to the size of the front. How to back a cross stitch compares the choices.
Can I wash a finished ornament? Not once it holds board or glue. Wipe a mark off gently with a damp cloth, and keep the ornament out of water.
What to stitch next
The ornament patterns and the Christmas ornaments are small enough to finish in any of these ways. For pins, patches and other little makes, see small things to make from cross stitch.