Cross stitch guide
Cross stitch tips for large projects
A large piece is stitched exactly like a small one. What changes is the planning: cut the cloth with margin to spare, grid it, hold it on a frame that rolls, and work the chart one area at a time while marking off what is done.
On this page 7 parts
Before you cut the cloth
A large design leaves no room to be nearly right about the fabric.
- Work out the stitched size. Stitches divided by the count of the cloth gives inches. A design of 280 by 210 stitches on 14 count is 20 by 15 inches (50.8 by 38.1 cm).
- Add the margin. The fabric calculator on this site allows 3 inches (7.5 cm) on every side for framing. On a large piece, do not cut it finer than that. The calculator, opened on 280 by 210 stitches, gives the size to cut.
- Deal with the edges. The cloth will be handled for a long time. Bind the cut edges with tape, or trim or stitch them, so they do not fray and catch the thread.
- Sort the thread. Wind or hang each color where its number can be read before the first stitch. A large chart can use a great many.
Grid it, then choose where to start
Gridding matters more as a piece gets bigger. With a line every ten stitches, a miscount is caught inside one square. Without it, a slip in the first week can surface months later.
Then start in one of two places. A design with bare cloth round it is begun at the center, so that it lands in the middle of the fabric. A design stitched edge to edge can be begun at the center or at the top left corner, with the margin measured out from the edge of the cloth first.
A hoop against a frame
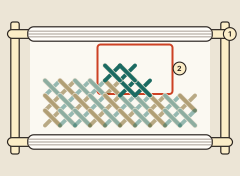
- A hoop is cheap and light, and a small one can be moved round a big cloth. It presses a ring into the fabric and into any stitches it sits on, so take it off at the end of every session. Roll or fold the spare cloth and clip it out of the way.
- A scroll frame winds the spare cloth round a rod at the top and a rod at the bottom (1) and stretches only the part between. It does not crease the work, and it shows a wide area at once (2). It is not a thing to carry about.
- A stand, on a table or the floor, takes the weight of either and leaves both hands free.
Hoops and frames compares every kind.
Keeping it clean
A piece that takes many months is handled a great deal, and every handling is a chance to soil it. Wash your hands before you stitch. Keep the cloth taut on a hoop or frame, so that your hands hold the frame and not the fabric. Between sessions, put the work away covered, folded or rolled round its frame, with the threads and the chart beside it. A grime guard, a fabric sleeve round the edge of the frame, keeps the part under your hands clean.
Working in pages
A large chart is printed over several pages. Take it one area at a time: a page, or a quarter of the design. A finished area is progress you can see, and a small area is easy to check.
Do not stop every color dead at the edge of the page, though. Where a color runs on into the next page, follow it over the line. A piece filled strictly page by page, or square by square, can show a faint line at each join.
Inside an area, the choice is between one color at a time and the parking method. What order to cross stitch in weighs them.
Tracking progress
- Mark the chart as you go. Highlight each square or each run as it is stitched. On a long project, the chart is your memory.
- Mark what is finished in a bigger way too. Each completed page is a milestone worth noting.
- Keep something small going beside it. A short piece finished in between brings you back to the long one fresh.
Keeping your place has more ways to follow a big chart.
Where to go next
If every square of your design is stitched, read full coverage cross stitch. For a design with bare cloth round it, begun from the center, look through the samplers.