Cross stitch guide
Keeping a cross stitch project journal
A project journal is a page for each piece you stitch. Write down the pattern, the fabric and its count, the thread numbers, the strands, the day you started and anything you changed. Months later, that page answers the questions your memory cannot.
On this page 7 parts
Why keep one
A cross stitch project can take months, and it is often put down for a while. When you come back, the questions start. Which count is this cloth? Was it two strands or three? Which thread did I swap, and for what? A journal answers them, because you wrote the answers down when you knew them.
It also remembers finished work. When someone asks for the same piece again, or you want the same fabric for the next one, the page is there.
What to write down for each project
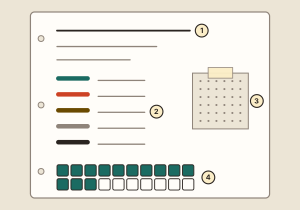
Give every project its own page. The picture shows one way to lay it out.
- The pattern (1): its name, who designed it and where you got it.
- The dates (1): the day you started, and later the day you finished.
- The fabric (3): what kind, what color and what count, and the size you cut. A small offcut taped to the page keeps a sample of it.
- The threads (2): the maker and number of every color. A short snip of each thread, looped through a punched hole or taped beside its number, shows the color itself.
- The strands: how many for the crosses, and how many for any backstitch.
- Where you started on the cloth.
- What you changed: a swapped color, a border left off, a name or date added.
- Where you stopped: a line whenever you put the piece away for a while.
- Where it is kept, if you have more than one or two projects on the go.
Write the facts first. Anything more is up to you: a photograph at each stage, a note on what went wrong, what you would do differently. You do not have to write every day. A line when something changes is enough.
Paper, a spreadsheet or a notes app
Each works. Choose the one you will keep up.
| Kind | How it is used | Good for |
|---|---|---|
| A notebook | A page or two for each project, in the order you start them. | Keeping it simple. It can hold thread snips and offcuts. |
| A ring binder | Loose pages with a divider for each project. Pages can be added, moved, or kept with the chart. | Large projects, and keeping the chart and its notes together. |
| A spreadsheet | One row for each project, with a column for each fact. | Many projects. It can be sorted, and opened on a phone in a shop. |
| A notes app | One note for each project, with photographs. | Having it with you wherever you are. |
There is no printable journal page on this site. A plain ruled page with the list above as its headings does the job.
How to track progress
Marking the chart shows where you are: see how to keep your place on a pattern. A journal can add how far you have come.
- Count blocks, not stitches. A chart is ruled in blocks of ten squares by ten. Draw one small box in the journal for each block of the chart, and fill a box when its block is finished (4 in the picture).
- Or work it out from the key. The thread key of every cross stitch pattern on this site gives the number of stitches in each color. Add them up for the total. The stitches of the colors you have finished, divided by the total and multiplied by 100, is the share done, as a percentage.
- Or take a photograph to go with each entry.
This site gives no estimate of how long a design takes to stitch. Your own journal can tell you: the dates on its pages show how long pieces like this one took you.
Several projects at once: a rotation
Stitchers have their own words for this. A WIP is a work in progress. A UFO is an unfinished object: a piece put away part done and no longer being worked on. The glossary has more of them.
A rotation is a way to keep several works in progress moving. You choose a small set of projects and work on each in turn, moving on by a rule you set.
- Choose the set. Keep it small. It helps if the projects differ: one large piece, one small one for a spare quarter of an hour, one easy enough for the evening.
- Choose the rule for moving on. A week on each is one way. A set amount of time on each is another, and so is a set number of stitches.
- Write the rotation in the journal, with a line for each turn. Then you can see which project is next and which has been skipped.
- Let projects in and out. When one is finished, another takes its place. The risk is that a project rotated out never comes back. If one has been out for months, decide about it on purpose.
A project bag for each piece, holding its cloth, chart and threads, makes switching quick. See how to organize floss.
When a project has stalled
Projects stall. A piece turns out larger or harder than it looked, or it is simply forgotten at the bottom of a bag. The journal page helps you start again, because the count, the strands and the place you stopped are written down.
If you do not want to finish it, you have choices. Put it into the rotation and give it a short turn every few weeks. Give it to a friend who likes it. Cut out a part that is complete and frame that. Or pass it on: what to do with supplies and unfinished pieces covers how.
Where to go next
For a piece that will take a long time, see how to manage a large project. To record who made a piece and when on the piece itself, see signing your work. To keep a list of the thread colors you own, open the thread checklist.