Cross stitch guide
Needle minders
A needle minder is a small decorated magnet for the front of your cloth, kept there by a second magnet behind it. It gives the needle a place to wait whenever your hand lets go of it. You can make one from a small stitched piece and two strong magnets.
On this page 7 parts
What a needle minder is
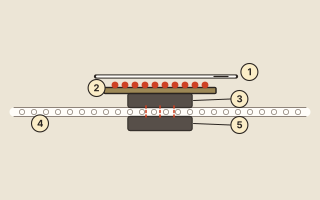
A needle minder is made of two pieces. One is the top (2), a small decorated piece with a magnet (3) fixed underneath. The other is a plain magnet (5) with nothing on it. The top lies on the front of the cloth (4), and the plain magnet goes behind the cloth at the same spot. Each magnet keeps the other where it is, with the cloth in between.
The needle (1) is steel and the top is magnetic, so a needle laid on the top stays there. That gives it one fixed place to wait while you change thread or put the work down.
It is not an essential tool. Stitchers use one because a needle with a home is far less likely to end up on the floor.
How to use one without marking the work
A needle minder makes no hole in the cloth, because no part of it passes through the weave.
- Pull the top and the plain magnet apart.
- Choose a spot near where you are working: close enough to reach without stretching, and far enough that your stitching hand does not catch it.
- Set the top there, decorated side up, and bring the plain magnet up behind it until the two grip.
- Test the hold with a light push. A top that moves needs stronger magnets.
- Lay the needle on the top each time your hand leaves it.
A minder also holds a threaded needle that is waiting its turn, which helps when a design changes color often.
What makes a good one
What separates a good needle minder from a poor one is how hard its magnets pull. If the pull is light, a knock to the hoop or a tilt of the frame sends the needle to the floor. Rare earth magnets, also sold as neodymium magnets, pull much harder than ordinary craft magnets.
How to make your own
Any small, flat, decorated thing can be the top. For a stitched one:
- Stitch a small design on plastic canvas. It is stiff and it does not fray. Cross stitch on plastic canvas explains the stitching.
- Cut it out. Leave about one square of canvas round the stitching, then trim closer without snipping a thread.
- Test the magnets. Take two small strong magnets and find the faces that pull together. Keep them that way round.
- Glue one magnet on. Put strong glue on the face that does not pull toward the other magnet. Press the stitched piece onto it, with the magnet in the middle of the back.
- Wait for the glue to harden, then add the second magnet. Pull on the glued magnet to make sure it holds before you use the minder.
Choose a strong glue that bonds to the metal of the magnet, so that the magnet does not work loose. A glue that dries clear does not show.
With only its one glued magnet, the same piece works as a fridge magnet: see how to make cross stitch magnets.
Magnet safety
Rare earth magnets are much stronger than ordinary ones. Loose, they are dangerous if swallowed, and more than one can cause serious injury inside the body. Keep spare magnets, and the needle minder itself, away from young children.
Common mistakes
- Gluing the wrong face. If the glued magnet faces the wrong way, the two parts push apart. Test before the glue goes on.
- Weak magnets. If the top slides on the cloth, the needle will not stay either.
- Using it before the glue has set.
Where to go next
A needle minder is an extra, not a necessity. Cross stitch supplies lists what you need first. For other little things to make from a small design, see small things to make from cross stitch, and choose a motif from the small patterns.