Cross stitch guide
How to make cross stitch magnets
Stitch a small design, give it a stiff back and glue a magnet to it. On plastic canvas the piece is stiff already and will not fray. On Aida it needs felt, card or interfacing behind it, and a little cloth left round the stitching.
On this page 9 parts
What to stitch it on
- Plastic canvas. It is stiff and it does not fray, so the stitched piece is cut out and is ready for its magnet. See cross stitch on plastic canvas.
- Aida or evenweave. Cloth is soft and its cut edge frays. It needs a stiff back and a margin of bare cloth.
- Perforated paper. Stiff, and it does not fray, but it cannot be washed. See how to use perforated paper.
Choose a small design. The small patterns are 700 stitches or fewer.
A magnet on plastic canvas
- Stitch the design.
- Cut round it, leaving about one square of canvas outside the stitching. Then trim closer, taking care not to snip a thread.
- Glue a magnet to the middle of the back and let the glue set.
For a neater back, cut a piece of felt to the same shape. Put the magnet between the canvas and the felt, and sew or glue the felt on round the edge.
A magnet on Aida
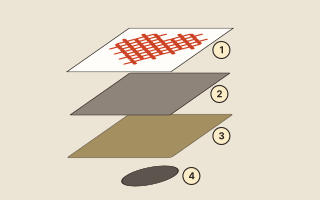
The numbers are the ones in the picture above.
- Press the piece from the back. If you have iron-on interfacing, fuse it to the back now. It steadies the cloth and holds its threads together.
- Cut out the piece (1) a few squares outside the stitching on every side.
- Stiffen it (2). Cut thin card to the same shape. This layer can be left out for a soft magnet.
- Back it with felt (3). Spread a thin, even coat of craft glue over the back of the piece, add the card, glue again and lay it all on a piece of felt a little larger. Wrap it in plastic wrap and leave it under a heavy book until the glue is dry.
- Trim the felt level with the edge of the piece.
- Glue on the magnet (4), to the felt, once everything else is dry.
Finish the edge
Glued to its backing, the cut edge of the cloth is held. For a tidier edge, work blanket stitch round it through the felt, or glue a cord round the outside.
Which magnet
- Flexible magnet strip or sheet. Thin and flat. A piece of it is glued to the back.
- Small disc magnets. Hard magnets, strong for their size. One in the middle of the back is enough for a small piece.
Magnet safety
Small strong magnets are dangerous if they are swallowed, and more than one can cause serious injury inside the body. Glue every magnet on firmly, and keep loose magnets and finished magnets out of the reach of young children.
Common mistakes
- Glue showing on the front. Use a thin, even coat. Too much glue oozes out at the edges and can come through the cloth.
- Cutting too close. Cloth cut right at the stitching frays into it. Leave the few squares.
- Gluing the magnet on too soon. Fix the magnet last, when the other layers are fully dry.
Questions people ask
Is a needle minder the same thing? Almost. A needle minder has a second, loose magnet that sits behind your cloth. Needle minders shows how to make one.
Can I wash it? Not once it holds glue or card. Wash and press the stitching before you make it up.
Where to go next
How to back a cross stitch compares felt, fabric and iron-on backings. For pins, patches and keychains, which are made in much the same way, see small things to make from cross stitch.