Cross stitch guide
How to start a cross stitch
Start in the middle. Fold the cloth in half both ways to find its center, find the center of the chart, and make the first stitch where the two match. The design then sits in the middle of the cloth with an even margin all round.
On this page 8 parts
Before the first stitch
Cut the cloth bigger than the design, so there is room to frame or finish it. The size of the design is its stitches divided by the count of the cloth: a design 84 stitches wide and 56 high comes to 6 by 4 inches (15.2 by 10.2 cm) on 14 count. The fabric calculator, opened on that design, adds 3 inches on every side for framing (7.5 cm when you work in centimeters) and gives the piece to cut: 12 by 10 inches (30.5 by 25.4 cm).
Turn the cloth so that its long side runs along the long side of the design. Turned the other way, this piece would leave only 2 inches (5.1 cm) at each side of the design. Then check that you have every thread color in the key.
Find the center of the cloth
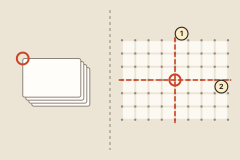
- Fold the cloth in half, side to side. Press the fold lightly with your fingers (1).
- Fold it in half again, top to bottom (2). The corner where the two folds meet is the center of the cloth.
- Mark that point before you open the cloth: a pin, or one small stitch in a thread you will pull out later.
On a bigger piece, some stitchers sew a line of long running stitches along each fold, in a thread that shows up, and take the lines out when the piece is done. The lines keep the center in sight for the whole project. Gridding takes that idea further.
Find the center of the chart
Most charts mark their own center: with small arrows at the edges, or with two bolder lines that cross. Follow each arrow in a straight line across the grid. Where the two lines cross is the center.
If your chart has no arrows, count its squares across and halve the number, then do the same down. A chart 84 squares wide has its center on the line between squares 42 and 43. A chart with an odd number of squares has a middle square.
On the cross stitch patterns here, the PDF gives the center as a column and a row, and arrows on the chart mark it.
Count to the first stitch
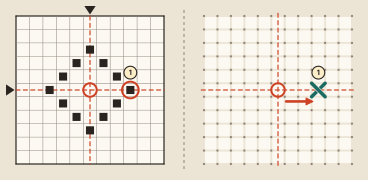
The center square of a chart may be empty. That does not matter. Find the stitch nearest to the center, and count the squares from the center to it: in the picture, three to the right (1). Count the same number of squares on the cloth from your mark, and make the first stitch there.
From then on, every stitch is counted from one you have already made. Go across the shortest gaps you can, because mistakes creep in when you count over a long stretch of bare cloth. How to count cross stitch shows the ways to keep it right.
When starting in a corner works
Starting in the middle is the custom, not a rule. Many stitchers begin a large piece that covers the whole cloth at the top left and work across and down, the way the pages of the chart run.
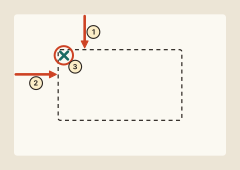
Work out the margin first, or the design will run off the cloth:
- Take the width of the design from the width of the cloth and halve what is left. That is the margin on each side. Do the same with the heights.
- Measure that far down from the top edge (1) and that far in from the left edge (2).
- Make the first stitch of the top left corner of the chart there (3).
On the 12 by 10 inch (30.5 by 25.4 cm) piece above, the first stitch goes 3 inches (7.6 cm) down and 3 inches (7.6 cm) in.
Common mistakes
- Starting near an edge by eye. The design ends up off center, or runs out of cloth. Measure or fold first.
- Counting from the wrong arrow. Follow both arrows all the way to where they meet before you count.
- Folding hard. Press the folds lightly with your fingers. You only need to see where they cross.
Questions people ask
Do I have to start in the center? No. It is the safest way to get the design in the middle of the cloth, and that is why most instructions say so.
The center of my chart falls between two squares. Which one do I use? Either. With a margin of a few inches, one square makes no difference you can see.
Where on the chart do I go after the first stitch? Wherever is easiest for that design. Work outward from stitches you have made, so that every count is a short one.
Where to go next
The first stitch needs a thread that stays put without a knot: How to start and end a thread has every way, and the loop start is the neatest of them for two strands. For the chart itself, read How to read a cross stitch pattern.