Cross stitch guide
What order to cross stitch in
No order is required. A common way is to work one color at a time inside a small area: finish every stitch of that color that touches, then change thread. Blocks and strict rows are slower on a simple design and worth it on a complicated one.
On this page 6 parts
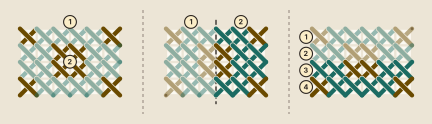
Three ways to work, and what each costs
| Order | How it goes | What it saves | What it costs |
|---|---|---|---|
| By color | All the stitches of one color in an area, then the next color | Thread changes. Long runs on one thread go fastest | Where a color is scattered, more counting across gaps and more thread carried across the back |
| By block | Every color inside one part of the chart, then the next part | A small area to check, and progress you can see | More starts and ends. If every row stops on the same line, the edge of the block can show |
| By row | Each row from end to end, changing color as the chart does | Every stitch sits beside a finished one, so the place is never lost | A change of thread every few stitches, or many threads waiting at once |
A way that mixes the first two
Pick an area you can take in at a glance. Stitch one color in it, following that color wherever it touches itself, then the next color, and so on until the area is full. Then move to the area beside it.
Two rules of thumb keep this tidy:
- Finish what touches. When you start a color, stitch at least every stitch of it that joins the one you began with, even where that crosses the heavy line of the chart or the edge of a printed page.
- Do not leap. If the color carries on a few squares away, about four squares is as far as it is wise to jump. Beyond that, end the thread and start again. Changing colors and carrying thread has the detail.
Row by row is the heart of the parking method. It suits charts where the color changes every stitch or two and there are no runs to follow.
Where to begin
- A design with bare cloth round it: the center. Find the middle of the cloth and of the chart and work outward, so the design lands in the middle of the fabric.
- A design stitched edge to edge: the center, or the top left corner. A corner start needs the margin measured out first, so that the far corner still fits.
- Then work downward when you can. Rows stitched from the top down let the needle come up in holes that are still empty and go down in holes that already hold thread. Coming up through a crowded hole is how stitches get split.
Inside one color: rows and columns
Along a row, work the first legs out and the second legs back. In a column, finish each cross before the next. Starting a new row shows how to move from one row to the row below.
Questions
Do you do one color at a time? Inside an area, usually yes. Across a whole large piece, only if the color lies in a few solid patches. A color sprinkled all over is better picked up area by area.
Should I finish one page of the chart before the next? You can, but let each color run on over the page line where it continues. A piece filled square by square can show the joins, and a page is only a large square.
Where to go next
For charts with a great many colors, read the parking method. For a big piece, tips for large projects covers planning the order across pages. Or put the order to work on one of the easy patterns, which have four colors or fewer.