Cross stitch guide
Cross stitch hoops, frames and stands
You do not need a hoop to cross stitch. A hoop or frame holds the cloth taut, which makes the holes easier to see and the stitches easier to keep even, so a beginner is usually advised to use one. A small hoop is the place to start.
On this page 12 parts
Do you need one?
No. Some stitchers always use a hoop and others never do. What a holder gives you is taut cloth: the holes open up and are easier to see, and it is easier to pull every stitch equally tight. Try one small piece with a hoop and one without, and keep whichever you enjoy.
Stitching in hand
Stitching in hand means holding the cloth with no holder at all. Many who stitch this way make each stitch in one motion from the front: the needle goes down one hole and up the next before the thread is pulled through. That can be quick, but without taut cloth it is harder to keep the tension even.
Kinds of hoop
A hoop is two rings, one inside the other, with the cloth gripped between them.
- A screw hoop has a screw on the outer ring that closes it. It comes in wood or plastic and is the one most stitchers use. On a plastic hoop, look for a lip or ridge between the rings: smooth plastic lets the cloth slip.
- A spring hoop has a metal inner ring that snaps into a groove in a plastic outer ring. It grips hard, but its handles get in the way.
- A flexi hoop has a soft vinyl outer ring that stretches over a hard inner one. It is awkward to stitch in and is mostly used to display a finished piece.
Round is usual. Oval and square hoops are made too.
How to use a hoop
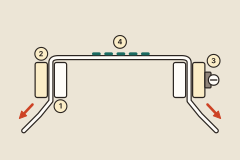
- Loosen the screw (3) and take the rings apart.
- Lay the inner ring (1) flat on a table. Lay the cloth (4) over it, right side up, with the part you want to stitch in the middle.
- Press the outer ring (2) down over the cloth and the inner ring. Loosen the screw more if it will not go on.
- Tighten the screw part of the way.
- Pull the cloth gently at its edge, a little at a time all the way round, until it is as taut as a drum. Do not pull the weave out of line.
- Tighten the screw the rest of the way.
Turn the hoop so that the screw is away from your stitching hand. The thread catches on it otherwise.
If the cloth keeps slipping, wind cotton tape round the inner ring. The tape grips the cloth, and it softens the crease the ring leaves.
Moving a hoop
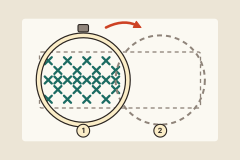
A hoop does not have to hold the whole design. Stitch the part inside it (1), take the cloth out, and put the hoop on again over the next part (2). The hoop can sit on finished stitches: slide the outer ring on gently and never force it over them.
Take the cloth out of the hoop whenever you stop for the day.
Getting hoop marks out
A hoop left on leaves a ring-shaped crease. Washing the finished piece and pressing it takes the crease out of work that can be washed. How to iron cross stitch has the method.
Clip frames
A clip frame is four plastic tubes joined at the corners into a square or rectangle. The cloth lies over the tubes and a long clamp snaps on over each side. It is thicker than a hoop and easier to grip, it tends to leave fainter marks, and spare cloth can be rolled up and held under the clamps.
Scroll frames and how to use one
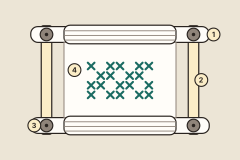
A scroll frame holds the full width of the cloth, so no ring sits on finished stitches and no hoop mark is left. It has a roller at the top and the bottom (1) and a bar at each side (2).
- Fix the top and bottom edges of the cloth (4) to the rollers. On many frames you sew the cloth to a strip of tape on the roller. On others a slot in the roller or a clip grips it.
- Turn the rollers to wind up the spare cloth until the part you want is between them.
- Tighten the knobs (3).
- When that part is stitched, loosen the knobs and roll on.
Side tensioners
The rollers pull the cloth tight from top to bottom. Nothing holds the side edges, so the cloth can sag at the sides. A side tensioner is anything that pulls a side edge out toward its side bar. There are two kinds:
- Lacing. The side edges of the cloth are laced to the side bars with strong thread, which is then drawn tight.
- Tension clips. Clips grip the side edge of the cloth and fasten to the frame.
A large scroll frame is heavy to hold for long. Prop it up or fix it to a stand.
Stretcher bars
Stretcher bars are wooden bars that join at the corners into a fixed frame. The cloth is tacked or stapled to the frame round its edge. Nothing rolls, so the whole design has to fit inside the frame.
Lap and floor stands, clips and clamps
A stand holds the hoop or frame for you. That frees both hands: one stays above the cloth and one below, and they pass the needle between them. A lap stand rests on your lap, a table stand on a table, and a floor stand on the floor by your chair. A plain clamp that holds a frame to the edge of a table does the same job.
With a hoop on a large piece, the spare cloth hangs down and gets in the way. Roll it up and hold the roll with clips or a soft band.
Mini hoops
Hoops as small as 1 inch (2.5 cm) across are made for finishing, not for stitching in: a tiny design is mounted in one as an ornament or a piece of jewelry.
Where to go next
For the hoop that fits a design, see the hoop size chart. To keep the cloth clean where your hands hold it, see grime guards. For a design too big for any hoop, see large projects. To display a piece in its hoop, see finishing in a hoop.