Cross stitch guide
Put together your own cross stitch kit
A kit is five things in a bag: cloth cut to size, the threads the key lists, a needle, the chart, and a note on how to start. A hoop is a welcome extra. Work out the cloth first, because everything else follows from the pattern and the fabric count.
On this page 8 parts
1. Choose the pattern
For a beginner, a gift or a class, choose a small design in few colors. The Easy patterns are four colors or fewer and 1,000 stitches or fewer, and every cross stitch pattern here is charted in full crosses only.
Note three things from the pattern: its size in stitches, the fabric count it is shown on, and the thread numbers in its key.
2. Cut the cloth
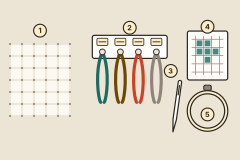
The cloth (1) is the size of the design plus a margin on every side.
- The design: stitches divided by the count gives inches. A design 60 stitches square is 4 1/4 inches (10.9 cm) square on 14 count Aida.
- The margin: the fabric calculator adds 3 inches (7.5 cm) on each side for framing, 2 inches (5 cm) for a piece finished in its hoop, and 1 1/2 inches (4 cm) for an ornament or card.
For that 60 stitch design, framed, the cloth to cut is 11 inches square, or 26 cm square if you measure in centimeters. Each is rounded up to a whole unit. The fabric calculator, opened on 60 by 60 stitches, shows the working, and you can change the numbers to your own pattern.
Cut along a line of holes so that the edges are straight. Preparing fabric shows how to stop the cut edges fraying.
3. Gather the threads
List the thread numbers from the key. The thread shopping list checks them against what you already own.
How much of each? As an estimate, one skein of six-strand floss works between 1,800 and 2,000 full crosses on 14 count with two strands, so in a small design one skein of each color is more than enough. Any thread amount is an estimate: stitchers differ, and scattered stitches use more than solid blocks. How much floss do I need explains the estimate.
Then make the threads easy to use (2):
- Cut each color into lengths of about 18 inches (46 cm).
- Punch a row of holes in a strip of card, one for each color.
- Loop each color through its own hole.
- Write the thread number beside each hole, and draw the symbol the chart uses for it.
A whole skein in a small labelled bag does the same job with less work. Organizing floss shows both ways.
4. Add a needle, and a spare
A blunt tapestry needle (3), sized to the cloth: size 24 for 14 count. Finer cloth takes a finer needle, such as a size 26. Needle sizes has the full table. Needles get lost, so put in two.
5. A hoop, if you like
A hoop (5) is not needed, but it helps a beginner keep the cloth taut. For the 60 stitch design on 14 count, the smallest hoop that holds the whole design is 8 inches (20 cm). A smaller hoop works too, because a hoop can be moved. Hoop sizes has the chart.
6. The chart
The chart (4) is the part to be careful with, because a pattern belongs to whoever designed it.
For patterns from this site, the terms of use say: "You may also make extra printed copies for your own stitching." So a kit you put together for yourself can hold a printed chart. How to print a pattern shows how.
A kit for someone else is different. The terms say you may not "sell, rent, share for download, re-upload or otherwise redistribute our charts, PDFs or previews, in whole or in part, whether free or paid, alone or in a kit or bundle". They also say what to do instead: "Sharing a link to a pattern page is always welcome. A stitching group or a teacher may point members to the page so that each person downloads their own copy."
So for a gift or a class, put a card in the kit with the pattern's name and its page address. The person who receives the kit downloads and prints their own chart, free.
For a pattern from anywhere else, read that designer's terms before you copy the chart.
7. A note on how to start
Add a slip of paper with the few things a first-timer needs:
- the count of the cloth and the number of strands to use (two, on 14 count);
- to find the middle of the cloth by folding it in half both ways, and begin there;
- where to learn the stitch: how to cross stitch.
Check the kit
Before you close the bag, check it against the pattern: every thread number in the key is on the card, the cloth is the count the sizes were worked out for, and the needle fits that count.